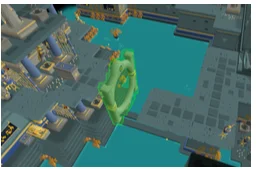
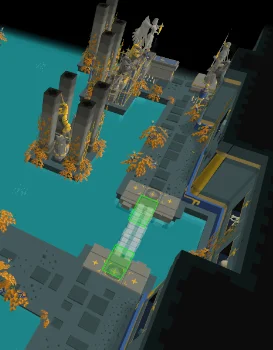
Efficient Strategy for Playing the Hallowed Sepulchre
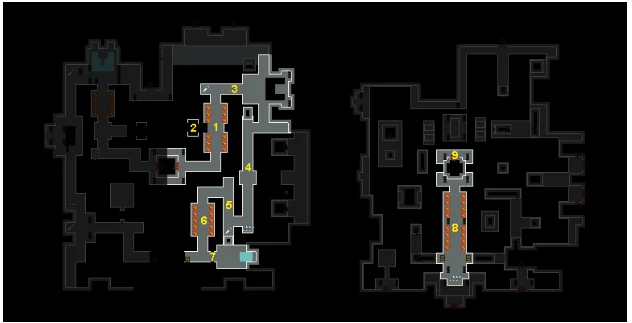
Here is the best strategy to run through all the obstacles in the Hallowed Sepulchre. Each floor has different entrances which are chosen at random each time. The best way to evade the obstacles at each entrance has been discussed below:
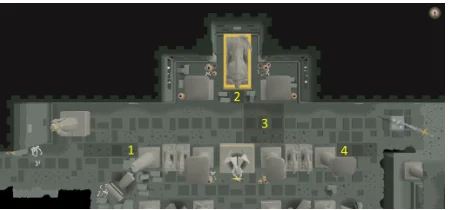
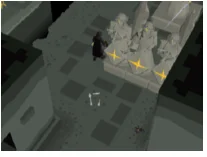
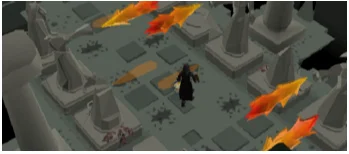
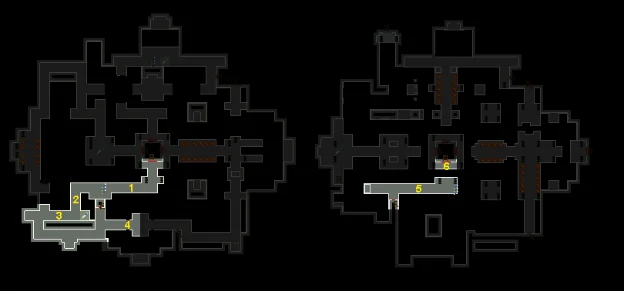
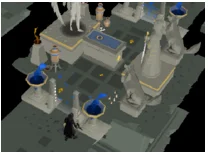
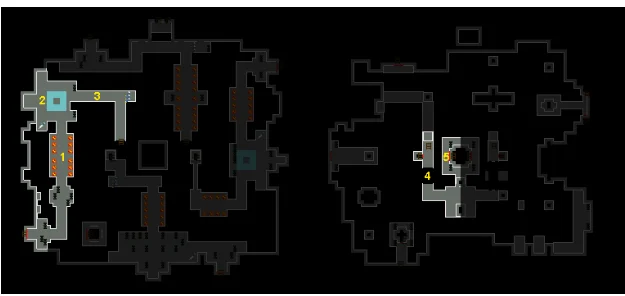
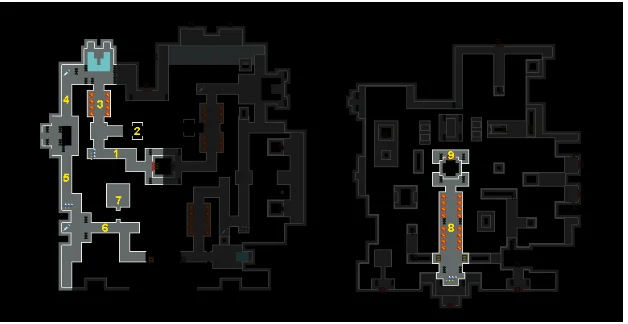
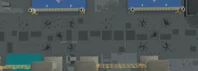
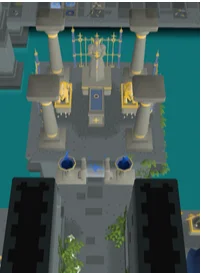
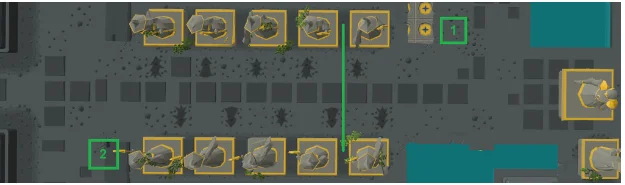
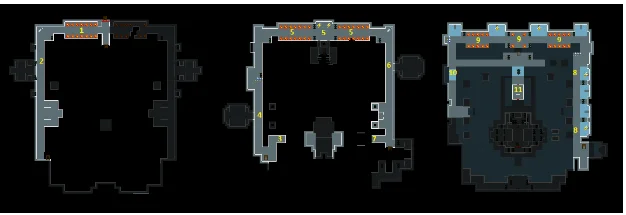
Floor 1
This floor has 4 possible routes
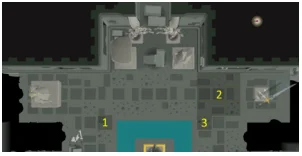
North entrance
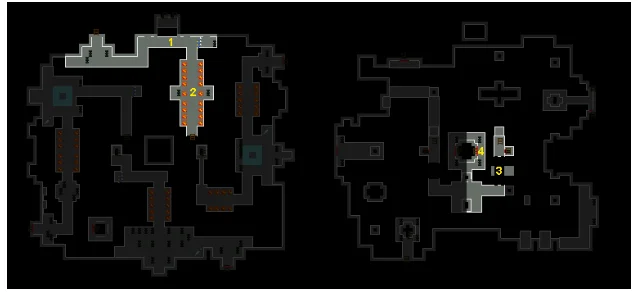
Arrow
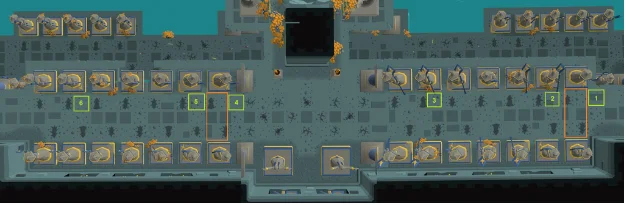
Pause at position 1, then proceed through the corridor towards the exit (3), dodging the arrows along the way. If needed, take a moment near tile 2 before continuing to the exit. For more detailed tips, refer to the section on navigating arrow obstacles.
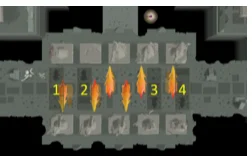
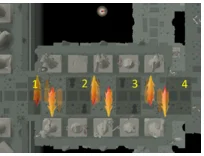
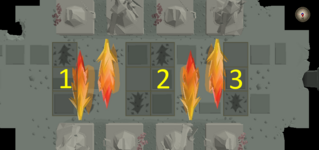
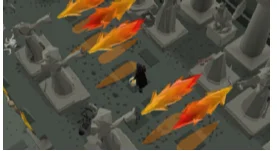
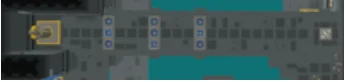
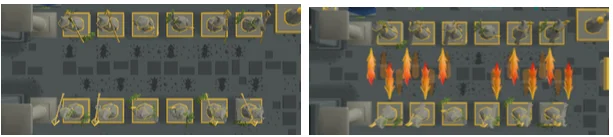
Flame

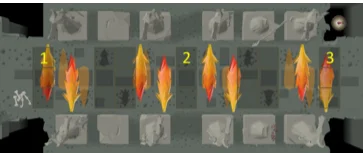
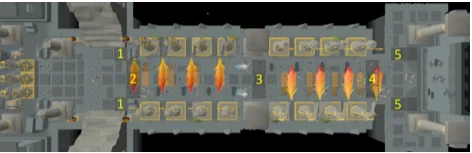
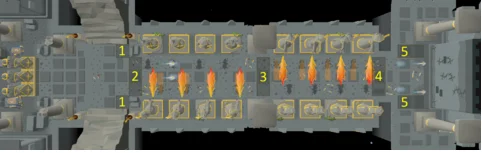
This obstacle can be completed in two stages or three when you're still learning. If the flames are inactive upon reaching the obstacle, move to tile 2. Wait for the flames to disappear, then proceed to tile 4, wait again, and finally move to the exit at tile 6.
If the flames are active, wait at tile 1, move to tile 3 when safe, wait for the flames to subside, then move to tile 5, and after another pause, proceed to the exit at tile 6.
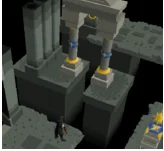
Coffin: Ranged challenge
Follow the Stairs and continue to floor 2.
East Entrance
Flame

This obstacle can be cleared in two stages. If the flames are inactive when you arrive, proceed to tile 2. Once the flames subside, move directly to the exit at tile 4.
If the flames are active, wait at tile 1. With perfect timing, you can move straight to the exit in one go. However, if there's a delay or you feel your click wasn't quick enough, move to tile 3 instead. Wait for the flames to subside there, then continue to the exit.
Sword
As you approach the entrance at tile 1, observe the position of the sword:
- If the sword is about to be thrown, wait until it passes you.
- If the sword is returning, wait until it passes you.
- If the sword is already past the square marked 2 by the time you reach tile 1, wait until it passes you.
In any other scenario, you can safely cross the obstacle without waiting. Proceed directly to the exit at tile 3.
Flame
This obstacle can be crossed in one stage, or two if you're still learning. To complete it in a single movement, wait at tile 1, then move directly to tile 3. If possible, you can save a small amount of time by pausing between the flames at tile 2 before continuing to the exit.
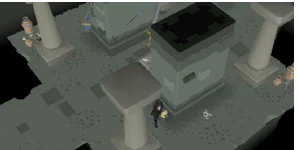
Coffin
This is a ranged challenge, climb the stairs and continue to floor 2
South Entrance
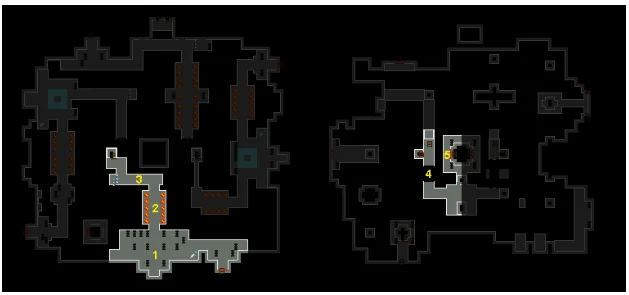
Sword
As you approach the entrance at tile 1, observe the position of the sword:
- If the sword is about to be thrown, wait until it passes you.
- If the sword is returning, wait until it passes you.
- If the sword is already past Tile 3 by the time you reach Tile 1, you can move to the safe alcove at Tile 2 and wait until the sword passes.
In other situations, you can safely cross the obstacle without waiting. Finally, proceed to the exit at tile 4.
Flame
- It is not possible to cross this set of flame statues in a single movement.
- If the flames are inactive when you reach the obstacle, proceed to tile 2, or to tile 3 if feasible. Wait for the flames to subside, then move to the exit at tile 4.
- If the flames are active, wait at tile 1, then move to tile 3. Once the flames subside, proceed to the exit at tile 4.
Arrow
Pause at tile 1, then enter the corridor and move towards the exit at tile 3 while dodging the arrows. If needed, wait near tile 2 before continuing to the exit.
Coffin
Construction challenge
Climb the stairs and continue to Floor 2
West Entrance

Flame
This obstacle can be crossed in one stage or three if you're still learning.
- Single Movement: Wait at tile 1, then move to tile 2. Once the flames subside, continue to the exit at tile 3.
- Learning Approach: Alternatively, pause at the first safe area (between tiles 1 and 2), then proceed to the third safe area (between tiles 2 and 3). However, this approach still requires two movements to reach the exit.
Sword
If the sword is returning or has already passed the square marked 2 by the time you reach tile 1, wait before proceeding. Once it's safe, move directly to the exit at tile 3.
Arrow

Pause at tile 1, then enter the corridor and move toward the exit at tile 3 while avoiding the arrows. If necessary, you can wait near Tile 2 before continuing to the exit. For more detailed guidance, refer to the section on arrow obstacles.
Coffin
Continue with Floor 2
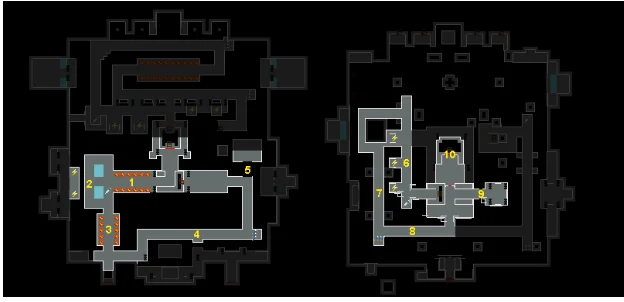
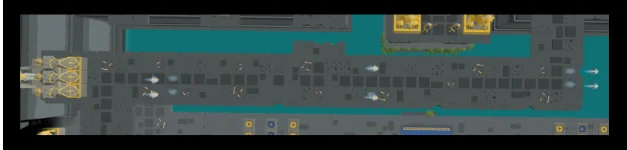
Floor 2
North Entrance
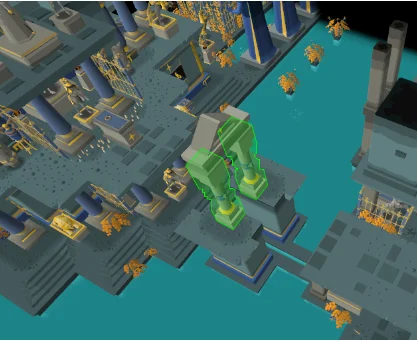
Jump
There is no chance of failure
Arrow
Change your camera to see the southmost
Sword
Coffin
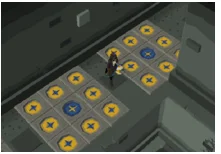
Floor
Flame
Climb the stairs and continue to floor 3.
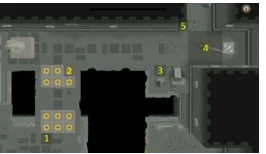
East Entrance
Flame

To navigate this obstacle in two stages:
- First, wait at tile 1, then move to tile 2. Once the flames subside, proceed to the exit at tile 3.
- Alternatively, you can pause at the first safe area (between tiles 1 and 2), then move to the third safe area (between tiles 2 and 3). However, this method still requires two movements to reach the exit.
Arrow

- Wait at tile 1, then enter the corridor and move towards the exit at tile 4 while avoiding the arrows. If necessary, pause near tile 3 before exiting. The tiles marked 2 are safe, but using them offers little advantage. Refer to the section on arrow obstacles for detailed guidelines.
- As you exit the corridor, ensure you stand exactly on tile 4 to avoid stepping on yellow tiles unless teleported onto one. From there, proceed toward the exit at tile 5.
Floor
Coffin
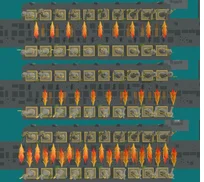
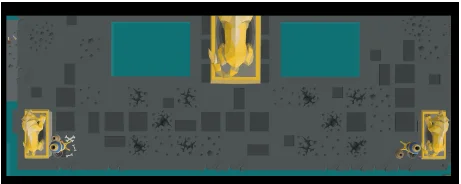
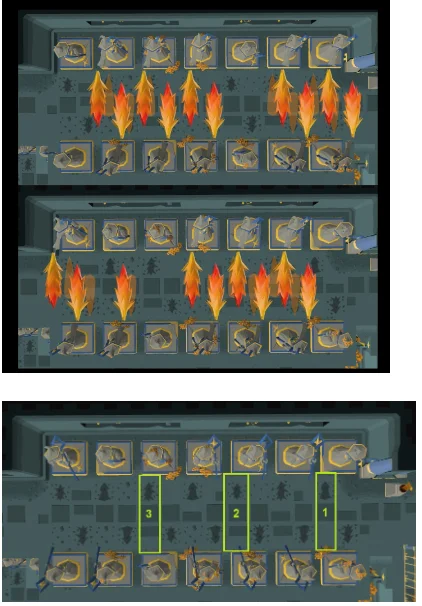
Flame
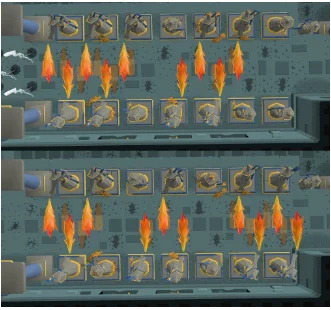
There are four stages, In the image below, wait at 1, move to 2, and move to exit 3
In the Image below, wait at 1 or 2 if possible, wait for the flames to subside, and move to exit 3
Climb the Stairs and continue to floor 3
South Entrance
Arrow
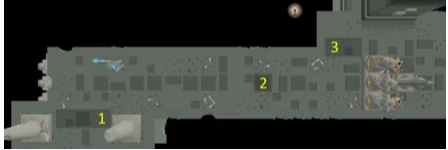
Wait at tile 1, then enter the corridor and move towards the exit at tile 3 while avoiding the arrows. If needed, pause near tile 2 before continuing to the exit.
Floor
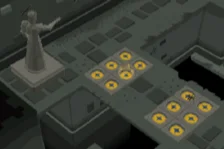
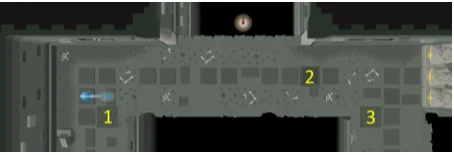
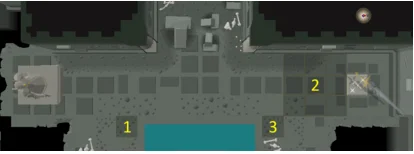
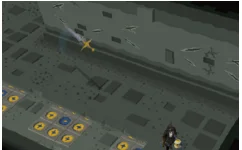
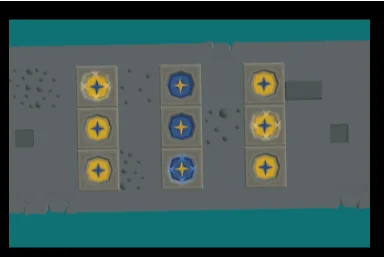
Sword
Move to the tile marked 2. If you first stand on tile 1 before moving, you'll only encounter two yellow teleportation tiles as a risk. Once you're on tile 2, assess the sword's position:
- If the sword is about to be thrown, wait until it passes you.
- If the sword is returning, wait until it moves past you.
- If the sword is past tile 4, you can move to the safe alcove at tile 3 and wait for the sword to pass, which should only take one tick.
In other situations, you can cross the corridor without waiting. If you get teleported while waiting, move to the closest inactive tile near the corridor and reassess the sword's position before proceeding. Finally, move to the exit at tile 5.
Coffin
Arrow

Wait at tile 1, then enter the corridor and proceed toward the exit at tile 3 while avoiding the arrows. If necessary, you can pause near tile 2 before exiting.
Continue to floor 3.
West Entrance
Sword
Coffin: ranged challenge
Floor
Flame:
Players can run past the two stages
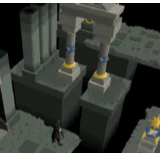
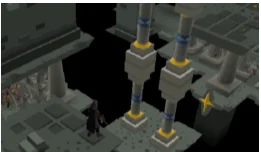
Sword
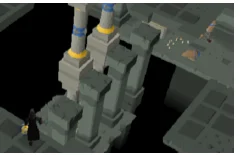
Walk around between the pillars to bypass the sword.
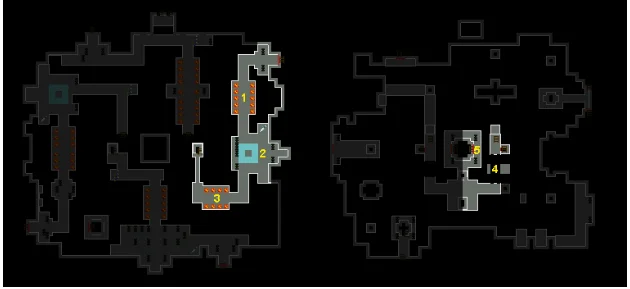
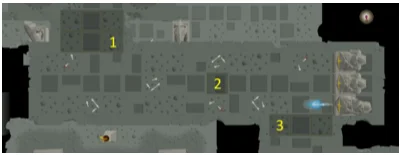
Floor 3
East entrance
Flame
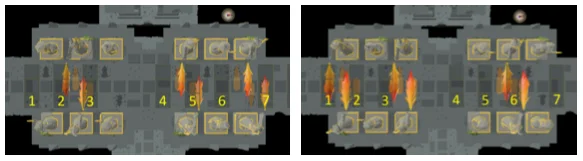
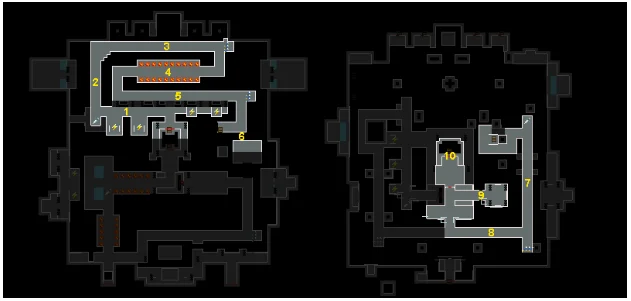
To navigate this obstacle in three stages:
- First Stage: Wait at tile 1 or 2, depending on the current phase, until the flames subside.
- Second Stage: Move to tile 4 if you waited at 1, or tile 5 if you waited at 2. Then, wait for the flames to subside again.
- Third Stage: Proceed to the exit at tile 7.
Coffin
There's an optional ranged coffin located to the west, positioned between the two groups of flames.
Sword
As you approach the entrance (1), check the statue’s sword position:
- If the statue is holding the sword:
- If the sword will be thrown in the next tick, wait.
- If the sword is thrown in two ticks, move to the alcove (3).
- Otherwise, proceed to the exit (5).
- If uncertain, move to the alcove.
- For a couple of ticks, after the sword stops moving, you can safely move to the alcove (2, then 3). Otherwise, wait.
- If the sword is returning, wait.
- If the sword hasn't reached square 4 by the time you reach 1, you can cross the obstacle without waiting.
Move to the exit (5).
Arrow
- Wait at position 1, then enter the corridor and move towards the exit (3) while avoiding arrows.
- If necessary, wait near tile 2 before exiting. Refer to the section on arrow obstacles for detailed instructions.
- When crossing the teleportation sections, minimize your steps on yellow tiles and be ready to shift to a safe lane if teleported.
Sword

It is possible to cross the obstacle without waiting for up to 1 tick after the sword stops moving
Flame Obstacle

- If needed, wait at position 1.
- Move to position 2 and wait for the flames to die down.
- Proceed to the exit (3).
Coffin
Complete prayer challenge
Continue to Floor 3 - lower floor
West Entrance
Arrow

Coffin
Flame: there are two stages of these, players can sprint after the inner stage.
Sword: and two-floor trap segments, players can hop a returning sword by hitting a blue tile

Arrow
Sword
Continue to floor 3 - lower floor.
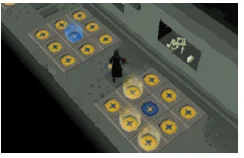
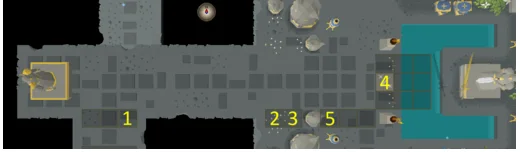
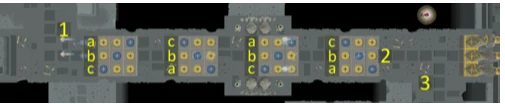
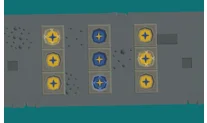
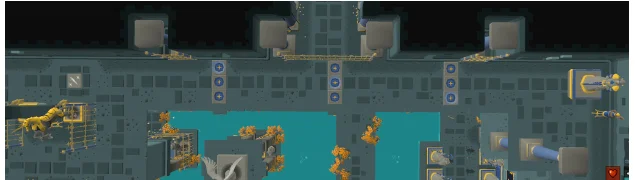
Lower Floor
Arrow
Cycle 1:
Cycle 2:
There are also two groups of flame statues, players should use the time between the flames to set up for future arrows
- Preparation and Initial Movement:
- Begin by waiting at position 1.
- Move to the safe tile on row 2 when the flames subside.
- Progress towards position 3 at a pace you find comfortable.
- Continue advancing towards position 4 in the same manner.
- If you’re in the middle lane and arrows are approaching from both sides, wait until they pass before proceeding.
- Move to the nearest exit (5).
- Flame Statue Timing:
- The flame statues alternate between on-off phases in a ten-tick cycle. This means:
- You should move an odd number of tiles between flame phases. If your final step is a walk from the second-to-last tile to the destination, you’ve moved an odd number of tiles. Running from the start to the destination without stopping results in an even number of tiles moved.
- Flames that are currently active will be inactive in the next phase. Focus on the glow on the floor rather than the flames themselves.
- Count four ticks and proceed to the safe zone at position 3.
- You can cross from row 2 to row 3 in a single movement between flame cycles, and later from row 3 to row 4. This strategy allows you to bypass the flame statue phases, saving time, but requires skill in dodging arrows:
- Start by waiting at position 1.
- After a set of arrows passes, move to row 2. Focus on dodging arrows by moving between tiles in row 2.
- When there are no arrows in your lane, look for an opening between flame phases to run to row 3. You may need to wait through several flame or arrow phases before finding this opportunity. The flame pattern is predictable, so concentrate on dodging arrows until the right moment.
- Repeat this process, moving between tiles in row 3 to avoid arrows until you find another opening in the flames to advance to row 4.
- When the path is clear of arrows, run to the safe zone (5).
Climb the stairs and continue to Floor 4
Floor 4
This floor has 2 paths that converge just before the final prayer coffin, Players usually loot the coffins on this floor for additional hallowed marks,
North Entrance
Lightning
Players can use a run trick to dodge the lightning
Sword
There are also several blue tiles
Arrow

Flame
North and south sets alternating, with every fifth cycle both firing. Easy and reliable method is to do the challenge with 3 leaps, with accurate timing, it can be done with 2 leaps.
Arrow

Coffin
Sword + arrows

One of the trickiest challenges on floor 4 as arrows have to be avoided while timing the sword.
Tips for passing it:
- If you move after the sword you must use the blue tiles to hop it.
- If you move before the sword and have to switch your path sideways a lot due to arrows, you might not outrun it. Catching the teleporter might save you.
Floor
Three narrow strips: the yellow can throw you back into arrows
Coffin
South Entrance
Flame:
- The central flame, as shown in the image, is never active.
- Tip: Often, you can click on the central spot after entering the floor and run there just in time to avoid being hit by the first flame block.
Lighting:
You can use the run trick to lodge this obstacle.
Sword + Flame:
Flame trap

Strategy tip
- Although this challenge might seem complex at first, a simple one-click strategy can help you pass it:
- Position yourself on the indicated tile 1 and wait for the sword to return.
- Once the sword is thrown, and it clears the indicated line, click on tile 2.
- Ignore the flames, and you'll easily complete the challenge.
- Note: If you start running too early, you may get hit by the sword's trailing edge and reset the challenge.
Arrow:
This is a long path with a safe ledge halfway along the southern side.
Coffin
Sword with Lightning Statues and Floor Tiles:
- Running after the sword can be tricky as you need to catch the teleporter to pass it.
- Running before the sword is easier using a single-click method, as long as you avoid the yellow teleporters. Positioning yourself close to the yellow teleporters at the start enables the run trick to bypass the lightning.
Arrow: with teleporting floor tiles.
Floor: These are three narrow strips;
Coffin; prayer challenge before the gate

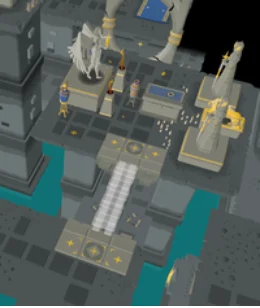
Floor 5
This floor has only one path leading to the Grand Hallowed Coffin. The obstacle mechanics are similar, except the flame statues here change phases 1 tick faster than on previous floors.
Flame:
The flame statues on this floor switch phases 1 tick faster than on the earlier floors.
- Safe Strategy:
- Run to the first position when possible.
- After the flames finish, move to position 2.
- After the flames subside, advance to position 3.
- Once the flames stop, complete the trap.
- If your timing is perfect, you can run from position 2 to the next trap. If not, wait at position 3.
Sword with Floor Tiles (Blue Tiles):
- Blue tiles are essential for passing this trap, as the sword moves quickly.
- Strategies:
- Behind the Sword, Teleport + Skip:
- Wait for the sword to be thrown and catch the first teleporter.
- Stop just right of the middle teleporter, and once the sword starts returning, step on it and teleport into the sword.
- Use the teleport’s invulnerability to bypass the sword.
- Double Teleport:
- Wait for the sword to return, or start running right after it is launched.
- Catch at least two teleporters to reach the safe enclave just before the sword’s stationary position.
- Returning Skip:
- If the sword is already returning, catch the teleporter to skip past it.
Coffin:
There is a magic challenge
Arrow
Arrow challenge with several rows of double teleport traps.
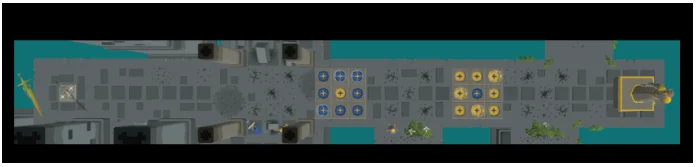
Flame with Lightning Traps:
First flame trap cycle
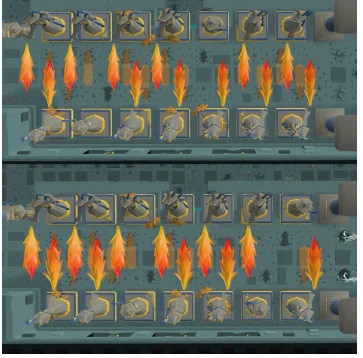
Second flame trap cycle
Two sets of flame traps with lightning traps in between. The flames have two phases. If you get damaged, you'll be sent back to just before the first trap.
- Safe Strategy:
- Start at position 1. Wait until the flame wall in front finishes, then run to position 2.
- If the trap is in the other phase, run to position 2 immediately.
- Once the flames stop, move to position 3.
- After the flames finish, run to position 4 (this will automatically help you skip the lightning in the top lane).
- At position 4, wait for the flames ahead to subside, then run to position 5.
- Once the flames die down, move to position 6.
- When the flames stop, run to the end of the trap.
Sword with Floor Tiles (Blue Tiles):

- Blue tiles are necessary to pass this trap, as the sword moves quickly.
- Strategies:
- Behind the Sword, Teleport + Skip:
- Wait for the sword to be thrown and catch the first teleporter.
- Move to the row of blue teleporters after the yellow one, and stop just left of the teleporter.
- Once the sword starts returning, step on it and teleport into the sword, using invulnerability to bypass it.
- Double Teleport:
- Wait for the sword to return, or start running right after it is launched.
- Catch at least two teleporters in a row to reach a safe enclave just before the sword’s stationary position.
- Returning Skip:
- If the sword is already returning, use the teleporter to skip past it.
Coffin
This is a ranged challenge just before the last flight of stairs.
Arrow

Long Corridor with lightning traps and floor tiles.
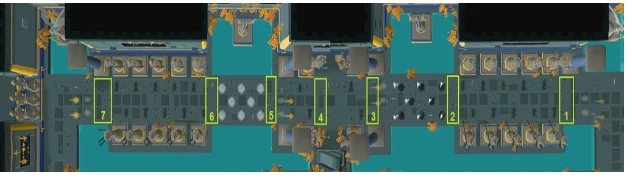
Final Challenge:
This long corridor combines multiple traps: alternating flames, arrows, and lightning.
- Strategy Suggestions for Beginners:
- Mistakes in this section are costly, so it’s often better to go slower to avoid errors.
- Always prioritize being in the correct lane before moving forward. Hallowed tokens can be helpful when starting out, as they give you more time.
- Run to "wait area" 1 and choose a lane according to the oncoming arrows.
- Identify which flame side was last active, move to that fire column, and align your lane according to the arrows.
- After the flames on the opposite side finish, run to "wait area" 2. If you've made it about a third of the way, you should be able to reach it.
- If necessary, step one tile forward and align your lane with the arrows before taking a larger leap forward.
- Don’t be afraid to progress in small steps—mistakes will cost more time.
- Once at "wait area" 2, select a lane based on the arrows and use the running trick to avoid lightning.
- The flame trap in front of "wait area" 3 activates less frequently than the next one. If unsure, wait for the blast to finish before crossing.
- Proceed to "wait area" 4, align your lane, wait for the blast to end, and cross.
- Move to "wait area" 5, choose a lane according to the arrows, and use the running trick to avoid lightning.
- The flame trap after "wait area" 6 is similar to the first one. The same approach applies, though it’s slightly more challenging since you're closer to the arrow spawn.
- After making it halfway, align with the arrows, and once the flames finish, run to "wait area" 7.
- In the last "wait area," you’ll have enough time to react to the next arrow pattern. Correct your lane and, once the arrows pass, make a run for the finish.
Coffin:
Grand Coffin:
This has a barrier entrance that closes once the timer runs out, similar to the stone doors that can block staircases on previous floors. The timer is paused when the player crosses the stepping stones, but the player cannot backtrack after doing so.
