Introduction
Whether you're pushing your first 99 or finally committing to maxing combat, this is the only Melee guide you need. I've maxed Melee on multiple accounts over 8 years. I trained it through Crabs, NMZ with broken Dharok setups, Slayer grinds, and, more recently, Sulphur Naguas and Gemstone Crabs. I've made every mistake along the way, and I'll save you from repeating them.
The guide runs level 1 to 99 in Attack, Strength, and Defence without jumping around. Every section builds on the last. You get the full quest stack that skips the painful early levels, every major training method with real XP rates, NMZ gear setups, and the newer methods like Gemstone Crab that reshaped the Melee meta.
If you find melee training boring and time-consuming, head over to our powerlevelling page and let our professional, fast workers handle it for you.
Let's get into it!
Is Melee Worth Training?
Yes. Without question. Melee is the backbone of the game. At low levels, it doesn't feel that way, but the moment you hit 80+ stats and bosses start dropping fast, you understand why people call this the most important grind in OSRS.
Here's the honest part: Melee is long. You're training Attack, Strength, and Defence as three separate skills, each of which requires 13 million XP to reach 99. That's 39 million XP total. Even at NMZ rates of 90-100k XP/hr, you're looking at 200-250 hours. Go in knowing that.
Why You Should Train Melee
- Bossing and raids: CoX, ToA, GWD, Corrupted Gauntlet, Doom of Mokhaiotl, Demonic Gorillas, most of the best content runs on Melee DPS. All three raids require it. High stats are the gap between a smooth kill and a painful one.
- Slayer: Higher Melee means faster task clears, more drops per hour, and access to the best boss tasks that print GP.
- Hitpoints come free: Every combat action gives a third of its XP to Hitpoints. By the time all three Melee stats hit 99, your HP is 99 too. You never train it on its own.
- PvP: If you ever fancy PKing, Strength is your single most important stat. With the best strength setup, the current PvP max hit with an Armadyl Godsword is 87.
Who Should Train Melee Early vs Later?
- Main accounts: Train Melee first. It opens the most content fastest, and Defence keeps you alive while you train everything else.
- Pures: Skip Defence entirely. Train Attack to 60 for the Dragon Scimitar; optionally, to 75 for the Whip, then push to 99 Strength. Never let the controlled style get clicked, or the build is ruined.
- Ironman: Non-negotiable. Higher Strength means faster kills at every supply source. Herb runs, seed drops, and food farming all speed up with better Melee.
My Honest Opinion
Don't try to max all three stats at once from the start. Pick one to focus on first. Most experienced players go 70/70/70 to unlock the best gear and methods, then push Strength to 99, then Attack for accuracy, and last, Defence. Strength gives you DPS, Attack gives you accuracy, and Defence keeps you alive; that's the priority order for almost all content.
(I'll be honest, on my first account, I did the opposite and pushed Defence first because I was scared of dying. Wouldn't do it again.)
How Melee Actually Works
Before the methods, it helps to understand what each stat actually does, because it changes how you pick gear later. Most guides skip this, and it's the reason so many players gear wrong.
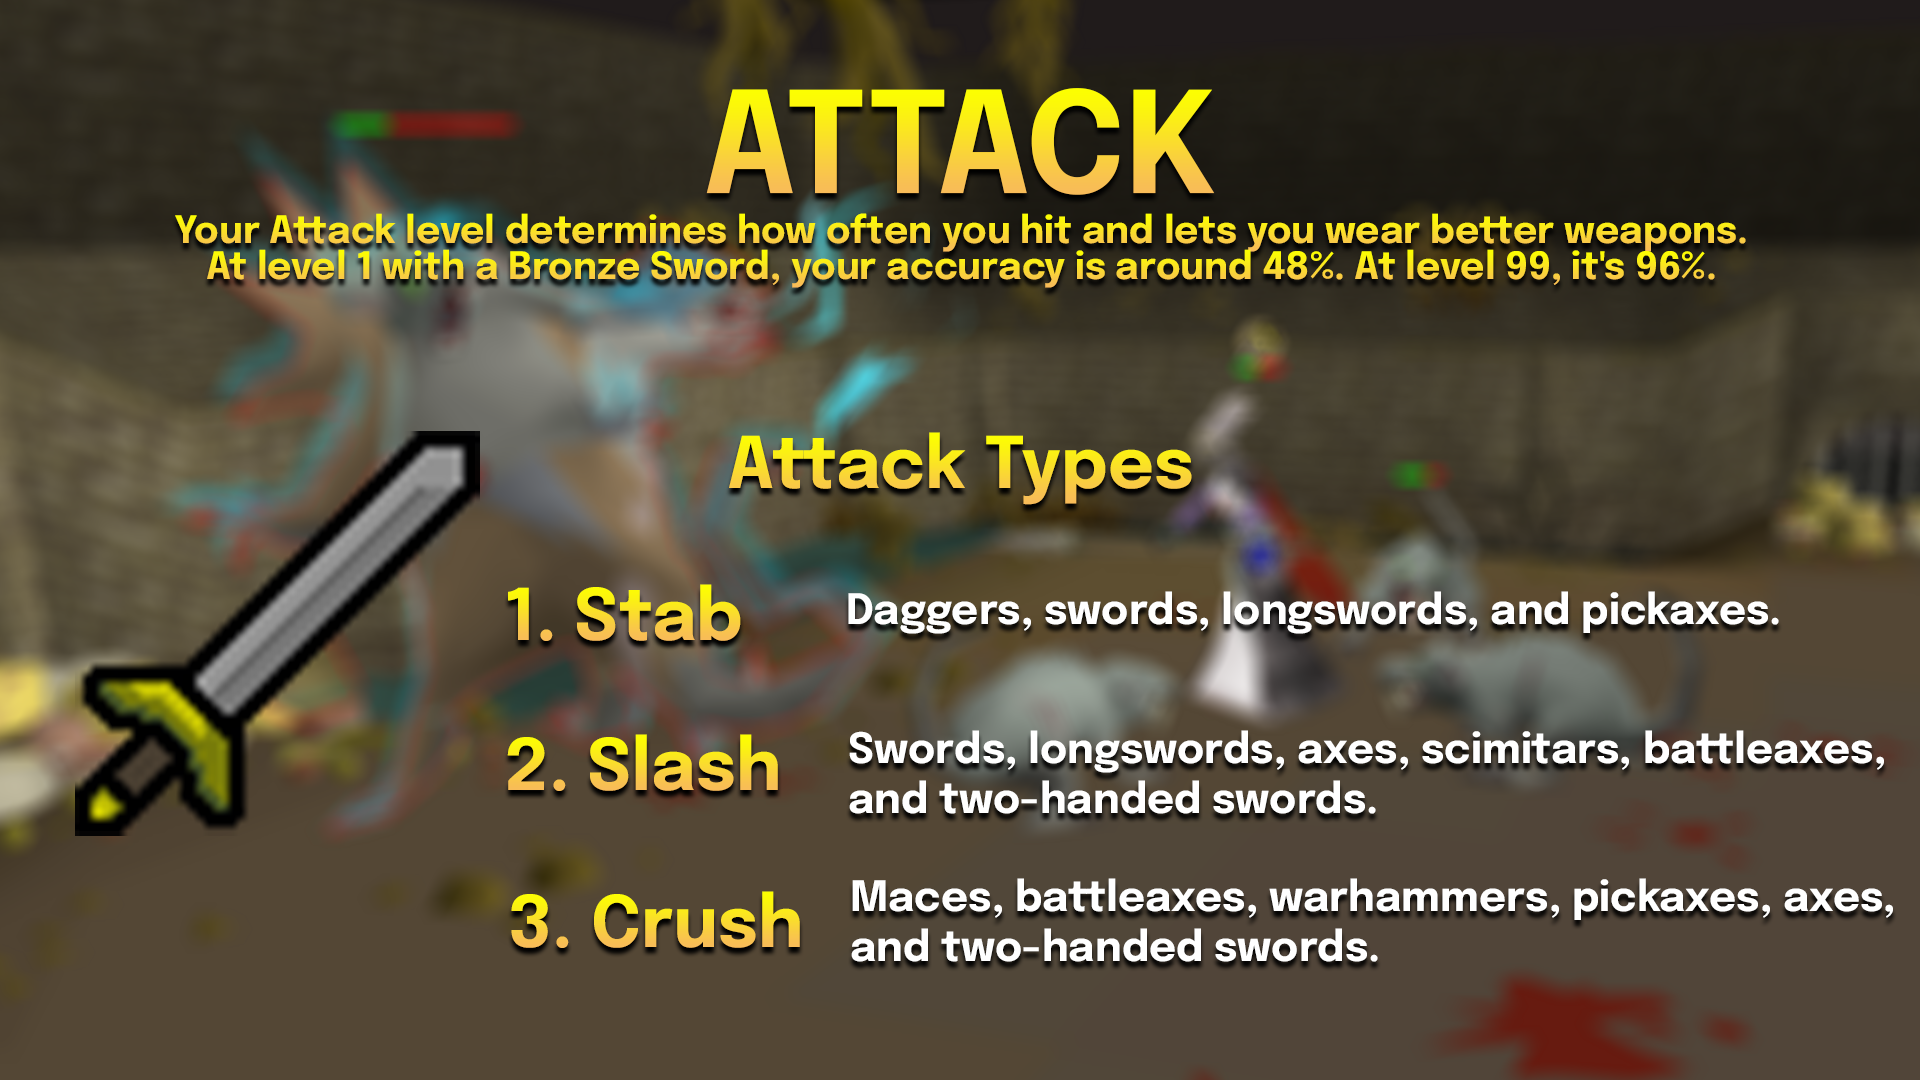
Attack = Accuracy
Your Attack level determines how often you hit and lets you wear better weapons. Take Sand Crabs as an example, at level 1 with a Bronze Sword, your accuracy is around 48%. At level 99, it's 96%. Your attack bonus from gear pushes that higher at 50 Attack with a +10 bonus, you're at 92% accuracy, and bumping the bonus to +100 takes you to 97%. Attack never affects how hard you hit, only how often.
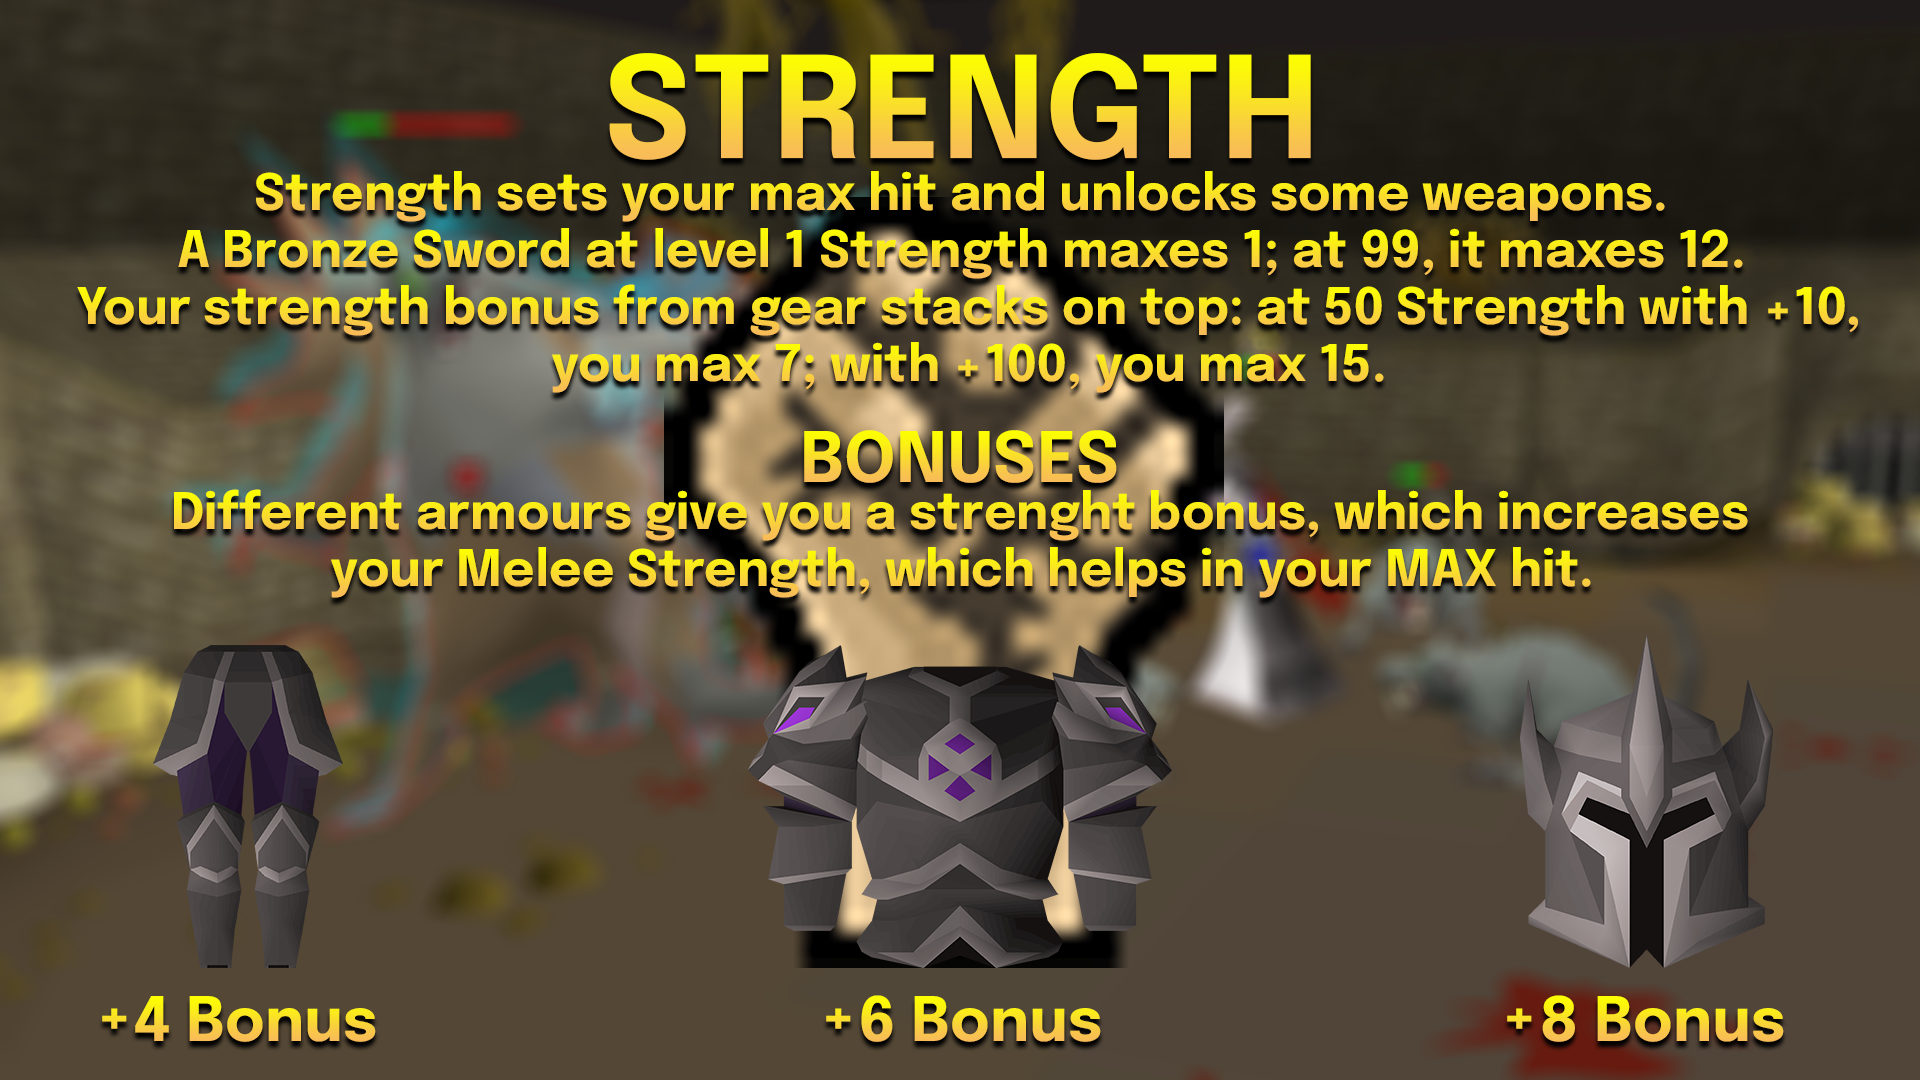
Strength = Max Hit
Strength sets your max hit and unlocks some weapons. A Bronze Sword at level 1 Strength maxes 1; at 99, it maxes 12. Your strength bonus from gear stacks on top: at 50 Strength with +10, you max 7; with +100, you max 15. It’s why I always tell people to prioritise the strength bonus over the attack bonus when choosing armour.
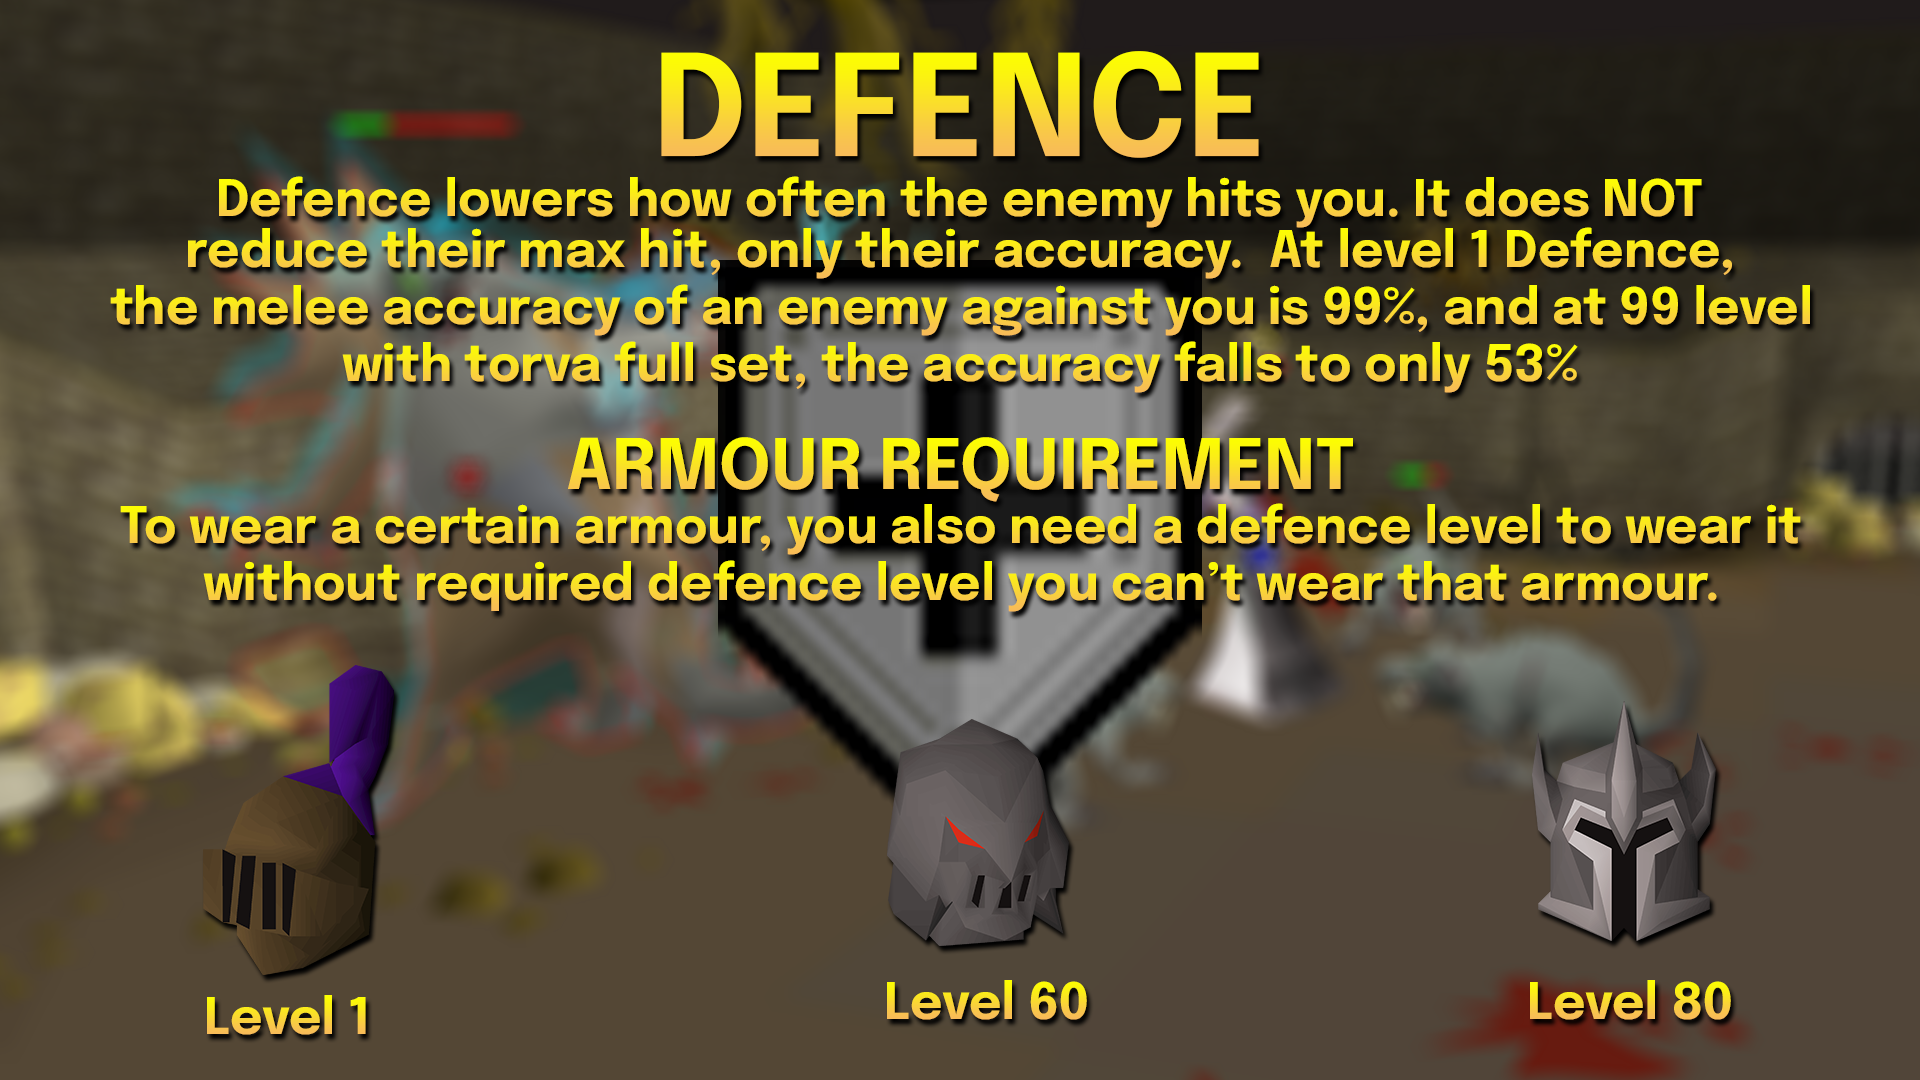
Defence = Enemy Accuracy (the one people get wrong)
Defence lowers how often the enemy hits you. It does NOT reduce their max hit, only their accuracy. Here's the part most players don't know: your Defence level does almost nothing on its own without a defence bonus from armour. Take General Graardor as an example. At level 1 Defence, his melee accuracy against you is 99%. At 99 Defence, wearing nothing, it only drops to 91%, barely a difference. But put on full Torva at 99 Defence, and his accuracy crashes to 53%. The armour is doing the heavy lifting, not the level. Keep that in mind every time you're tempted to train Defence to feel "tankier" without upgrading your gear.
General Efficiency Tips
Do the quest XP stack before anything else: The quests below push you to level 44 Attack, 38 Strength, and 38 Defence without grinding monsters. Waterfall Quest alone takes 20 minutes to complete across 30 levels, spanning two stats. Grinding Goblins for that would take 6+ hours.
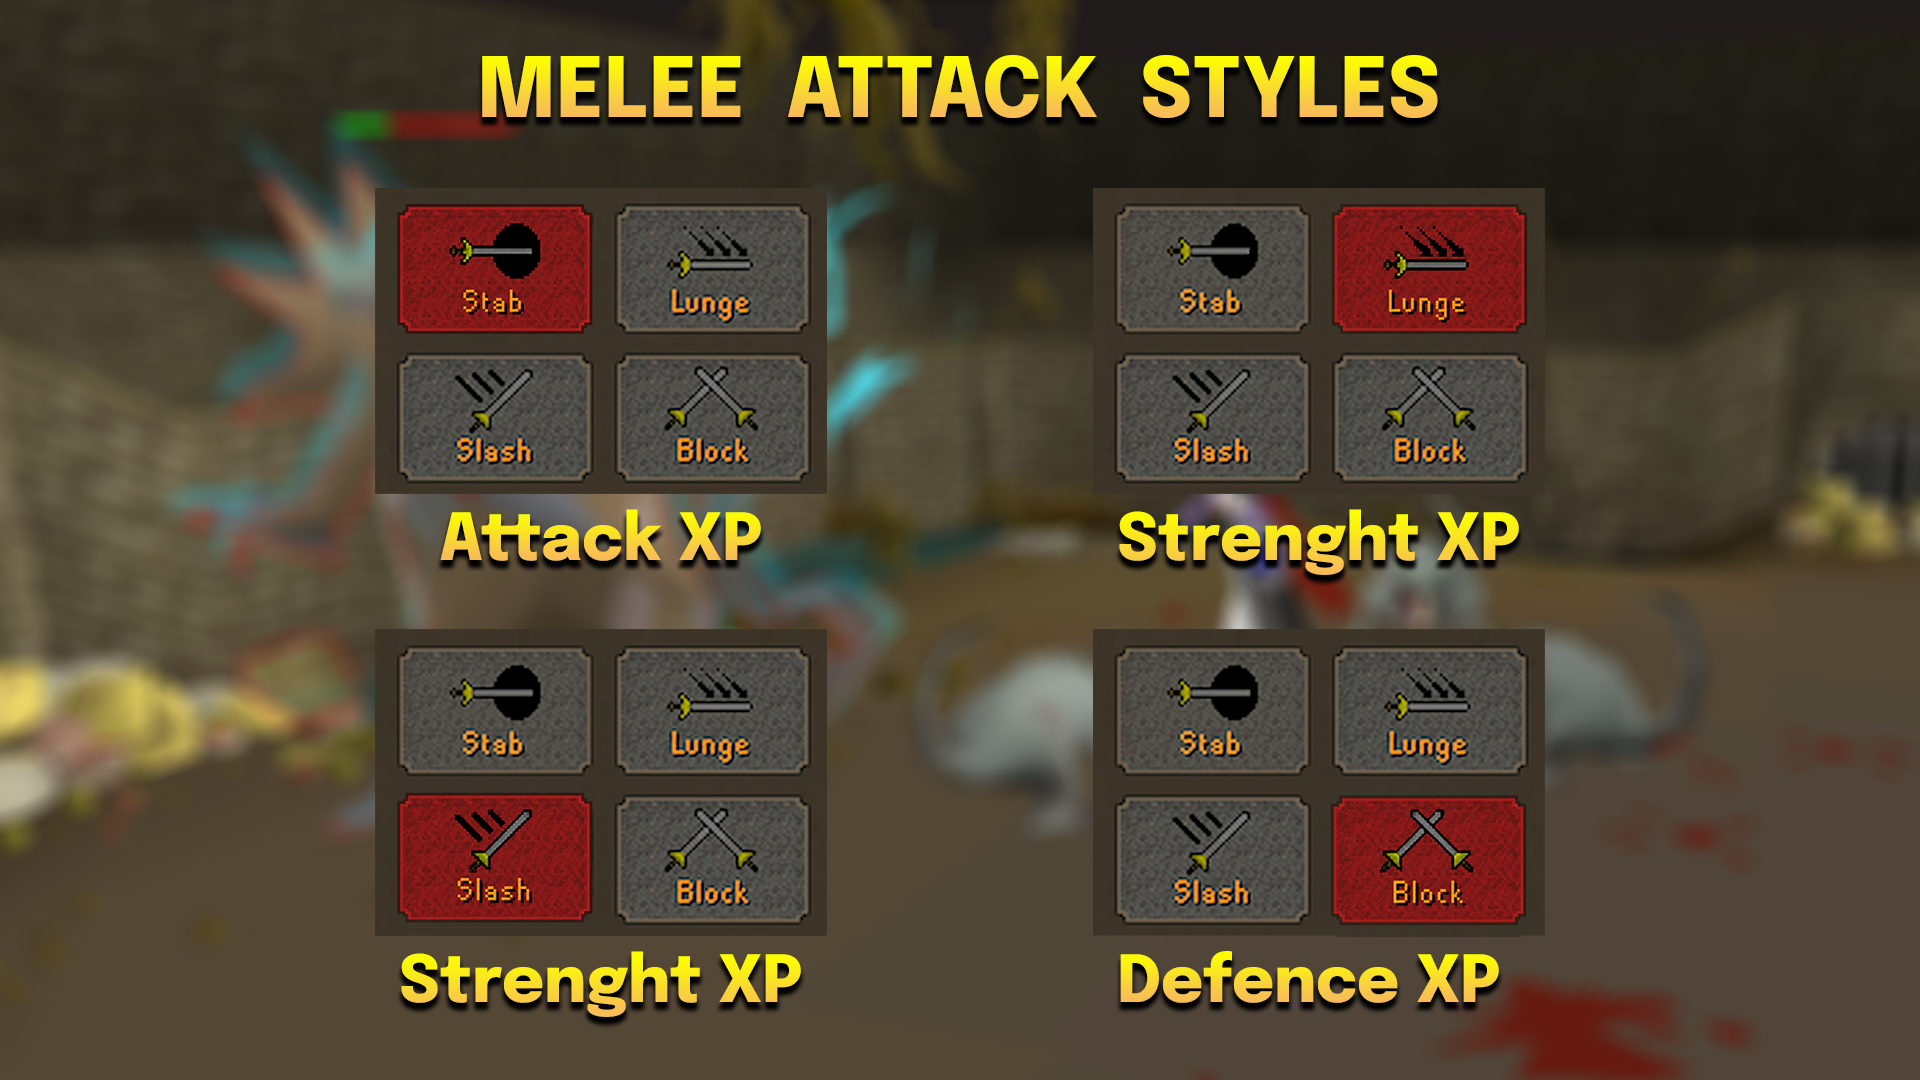
Check your attack style every session: Accurate trains Attack, Aggressive trains Strength, Defensive trains Defence, Controlled splits all three.
Head to the Warrior's Guild at 130 combined Attack + Strength: This unlocks Defenders, and you should go the moment you qualify. The Dragon Defender gives big attack AND strength bonuses in the shield slot. It's one of the best free upgrades in the game. Don't put this off.
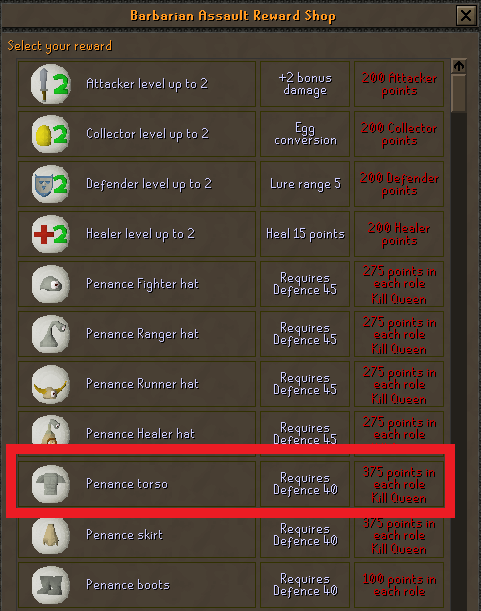
Get the Fighter Torso from Barbarian Assault: It gives the same strength bonus as a Bandos Chestplate, but it's free. There's almost no reason to buy a Bandos top for training when this is one of the highest-value grinds for any melee account. If you're eager to quickly acquire the Fighter Torso but have limited time, visit our minigame page to explore our minigame services.
Imbue your Berserker Ring at NMZ before serious grinding: The imbue costs 650,000 NMZ points and permanently doubles the ring's bonuses. Your first big NMZ point spend should always be this, never cosmetics.
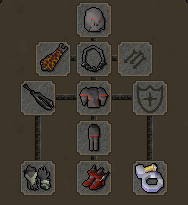
Obsidian Set is a sleeper budget option for mid training: The full set gives +10% accuracy and damage with obsidian weapons, and a Berserker Necklace adds a separate +20% damage on top of those that stack. Around 5M total, competes with Bandos at 60-80, no degradation. I ran it at Gemstone Crabs from 60 to 80, and the XP held up. You can find an Obsidian Gear below.
Fastest Way to Level Melee from 1-99
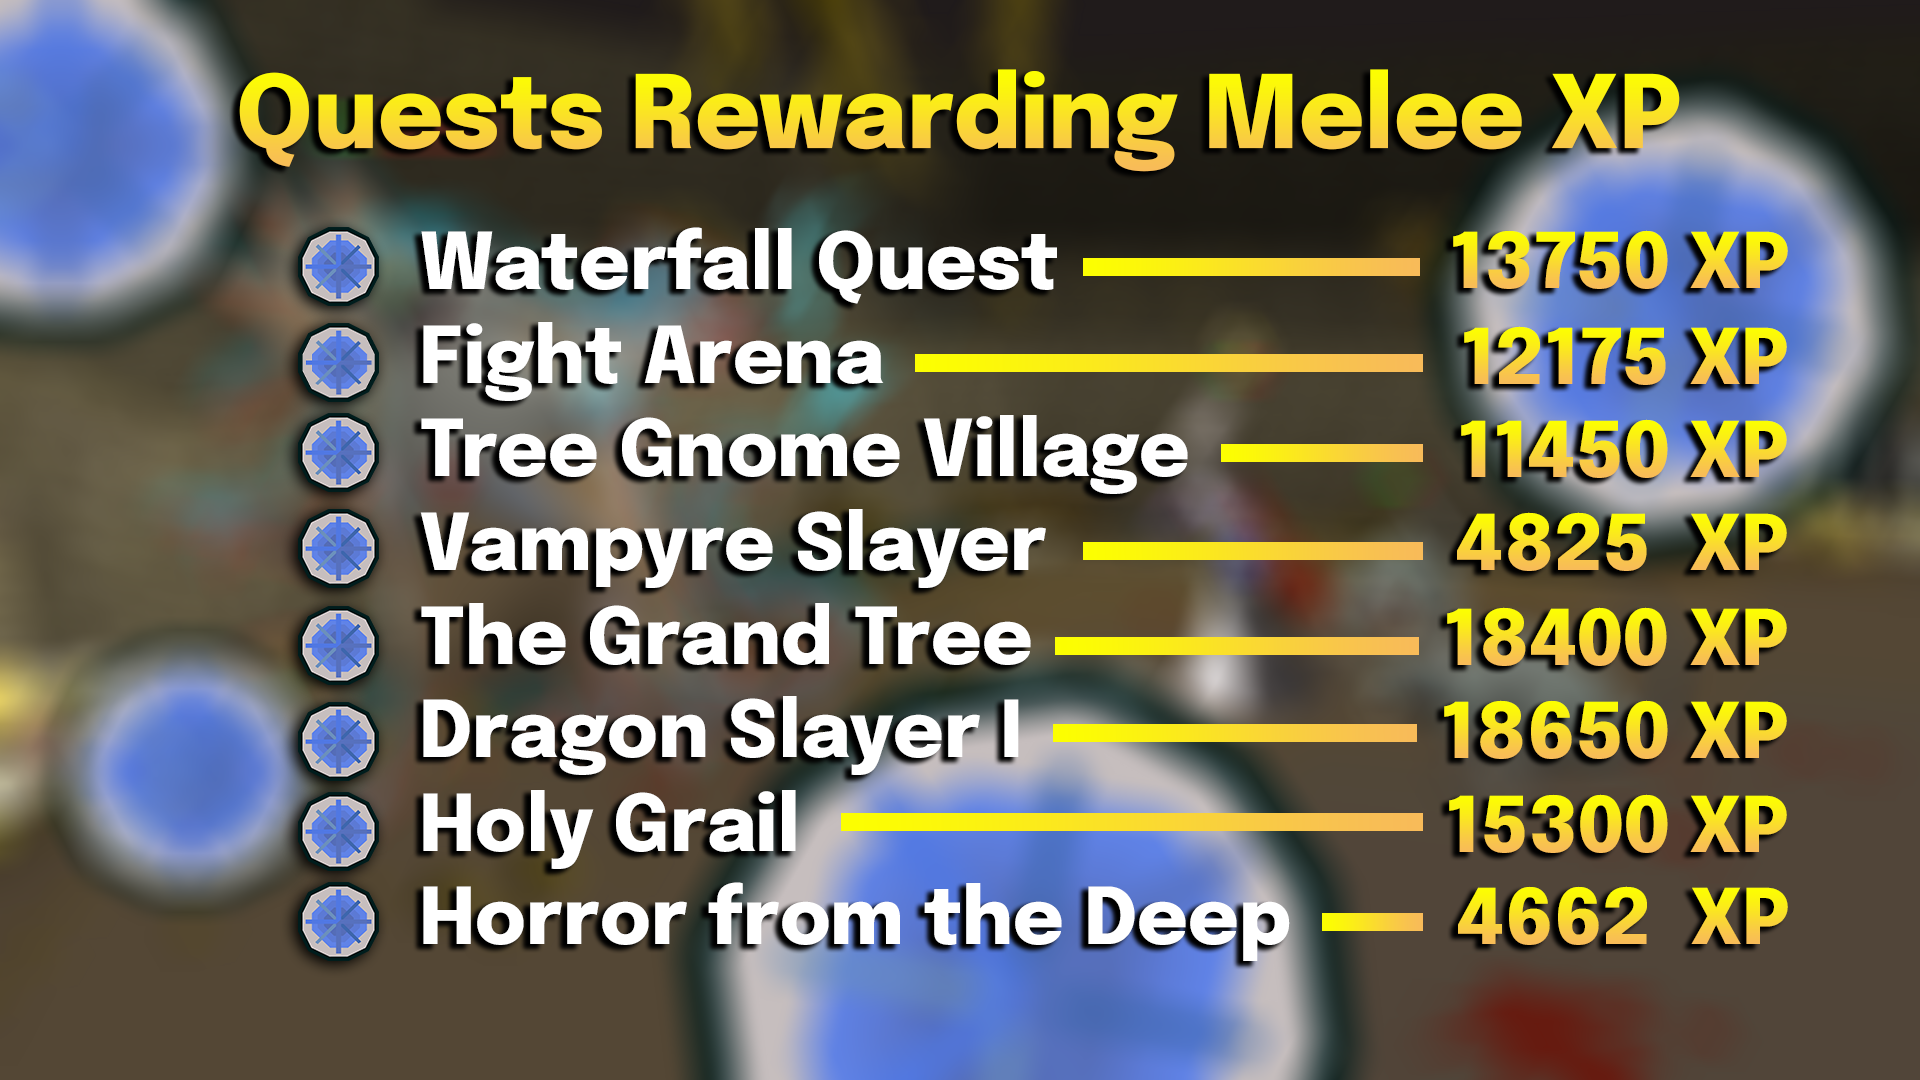
Before touching a single monster, do the quests below. Combined, they give you 44 Attack, 38 Strength, and 38 Defence from scratch. That's 20+ hours of early grinding skipped.
Quests to Skip Early Levels
These five reward Attack XP and are also required to unlock the Nightmare Zone. You want them done before you even think about NMZ, so do them straight away.
Quest | Attack XP | Other Reward | Requirements |
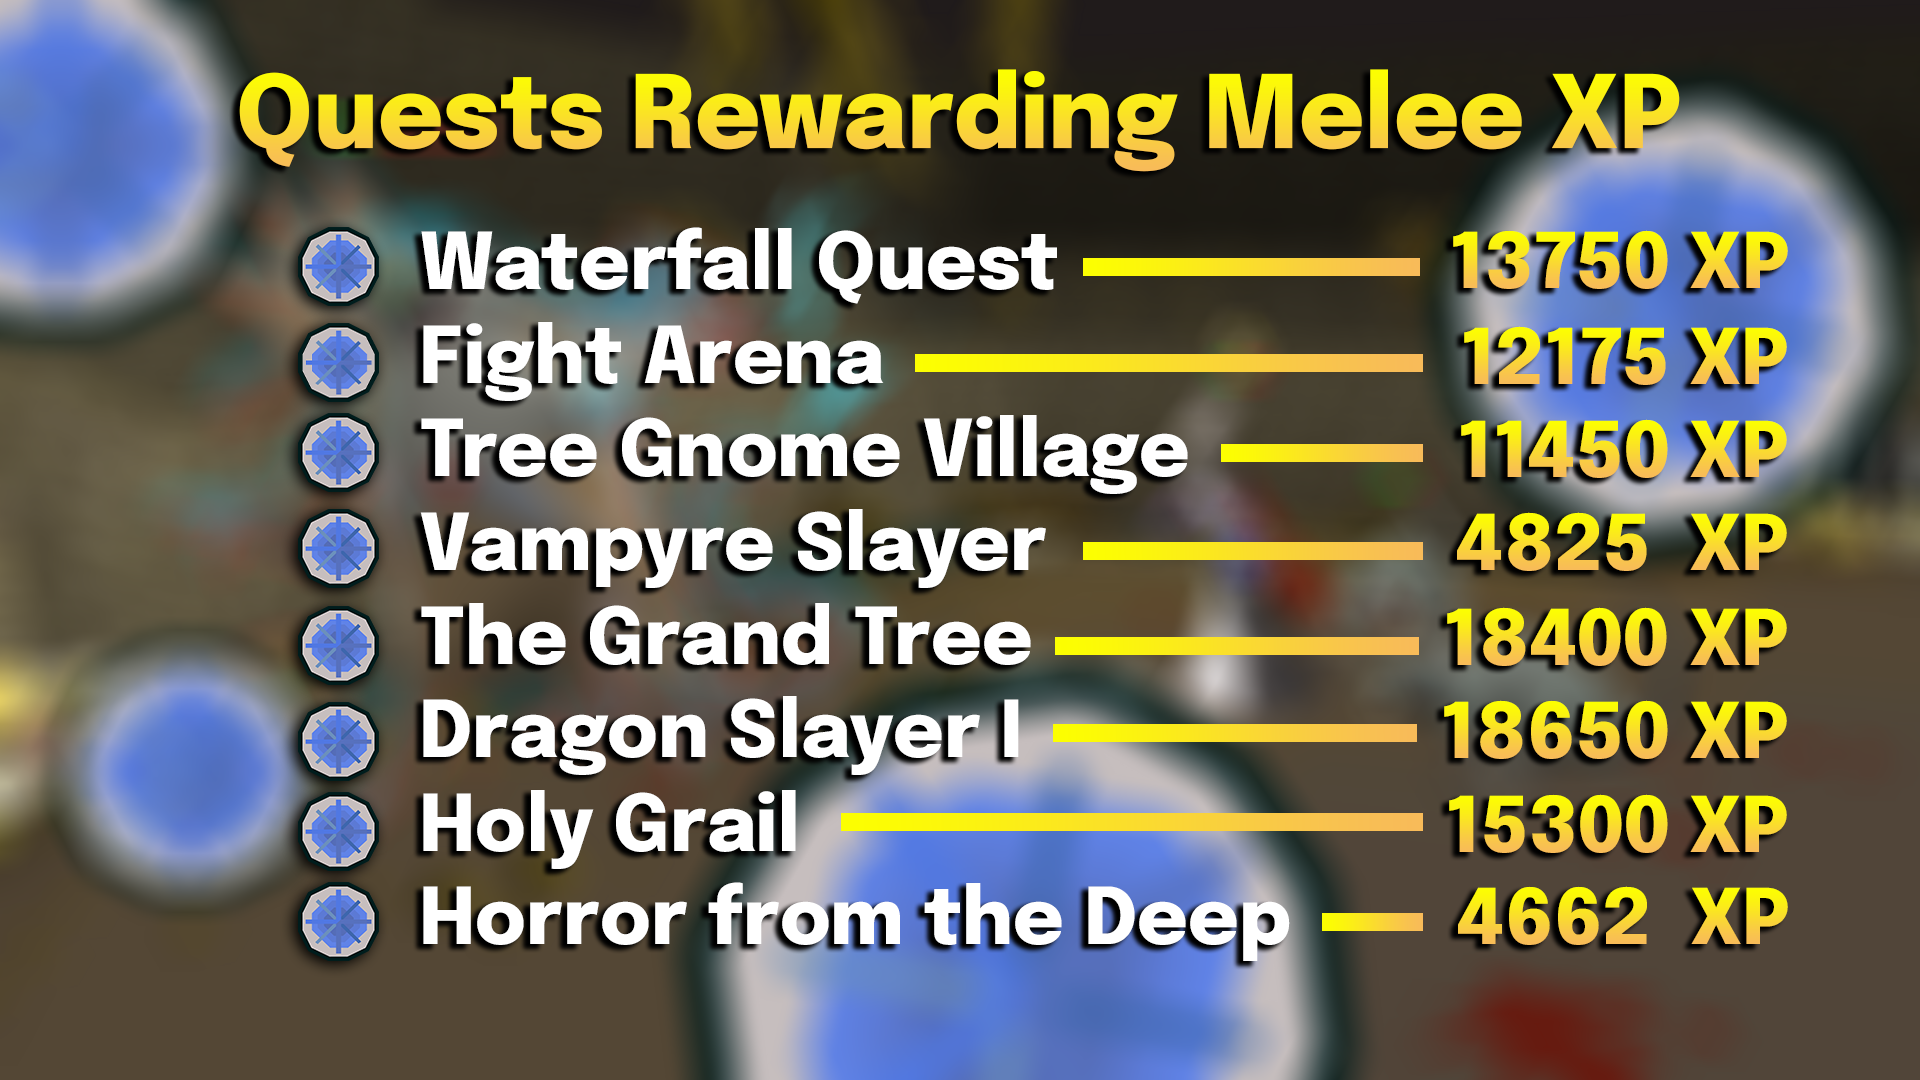
Waterfall Quest | 13,750 Attack | +13,750 Strength | None |
Fight Arena | 12,175 Attack | +2,175 Thieving | None |
Tree Gnome Village | 11,450 Attack | None | None |
Vampyre Slayer | 4,825 Attack | None | None |
The Grand Tree | 18,400 Attack | +7,900 Agility, +2,150 Magic | None |
TOTAL | 60,600 XP = Level 44 Attack | - | - |
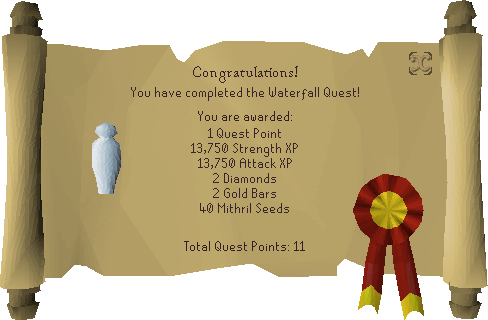
NOTE: For four of the above quests, you are required to unlock bosses in NMZ, except for The Waterfall Quest. So, add Lost City as NMZ’s fifth boss quest.
Now stack these for Strength and Defence:
Quest | XP Reward | Stat | Notes |
Waterfall Quest | 13,750 XP | Strength | 1 to level 30 Strength instantly |
Dragon Slayer I | 18,650 XP | Strength | Also gives 18,650 Defence XP |
Holy Grail | 15,300 XP | Defence | 1 to level 33 Defence |
Horror from the Deep | 4,662 XP each | Str / Range / Mage | Two lamp options |
After all of the above, you'll be sitting at roughly:
- Attack: Level 44 (60,600 XP from the quest stack)
- Strength: Level 39 (Waterfall + Dragon Slayer I + Horror from the Deep)
- Defence: Level 39 (Holy Grail + Dragon Slayer I = 33,950 XP)
NOTE: Lost City gives NO combat XP. It only unlocks the Dragon Dagger and Zanaris. Do it for the NMZ bosses, but don't expect XP.
Level 1-40: Quest Stack Only
Be clear with yourself here: do not grind monsters at 1-30 if you haven't done these quests. Cows for 1-30 take 4-5 hours. The waterfall takes 20 minutes. There's nothing more to argue about than that.
The only fight you actually need during the stack is Elvarg at the end of Dragon Slayer I. Bring Antifire Potions, Rune armour if you have it, and any decent weapon. She dies fast once you have the shield.
Level 40-60: Brutus
- Requirement: Ides of Milk quest
- XP/hr: ~30k-40K
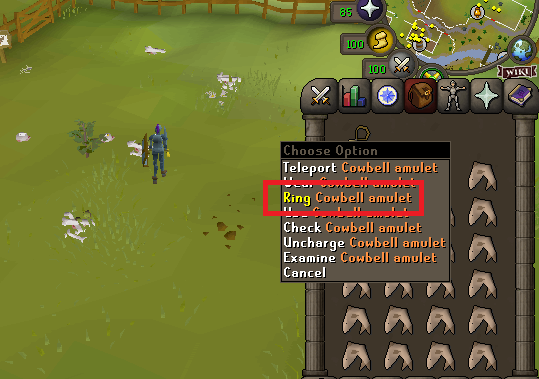
- Teleportation Method: Cowbell Amulet
Once you've completed the Ides of Milk quest, you can fight Brutus, located in the Lumbridge cow field. It's an excellent early-game training method for early-game XP.
I recommend using Rune armour along with a Brine Sabre as soon as you reach 40 Attack and 40 Defence. At these levels, you can expect around 30k-40k XP per hour, making Brutus a solid alternative to traditional melee training spots such as crabs.
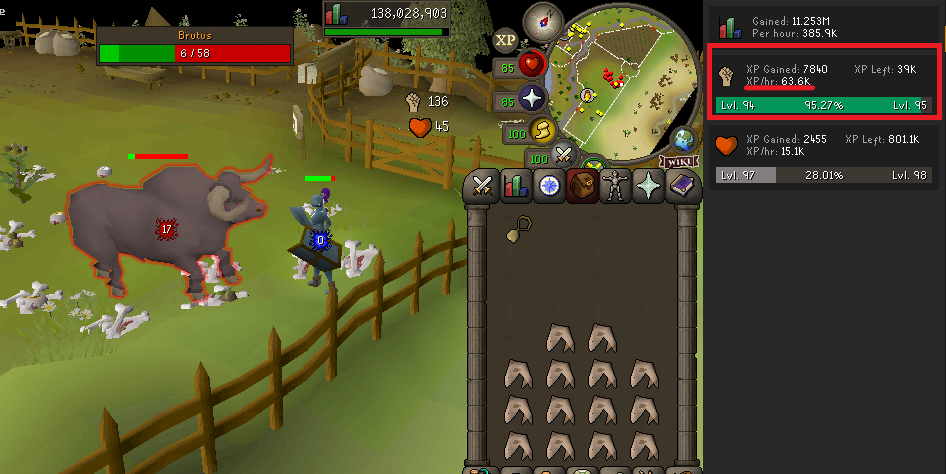
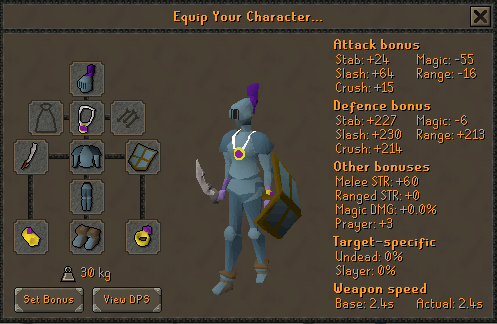
As your stats improve, Brutus becomes significantly more efficient. With 90 Attack, Strength, and Defence, I consistently achieved around 65,000 XP per hour, making it a worthwhile training option well beyond the early game. For this, I’m using the gear below: Rune Armour set, Amulet of Glory, Combat Bracelet with Brine Sabre.
Mechanics & Tips
Brutus has two special attacks that are easy to avoid if you pay attention to his animations:
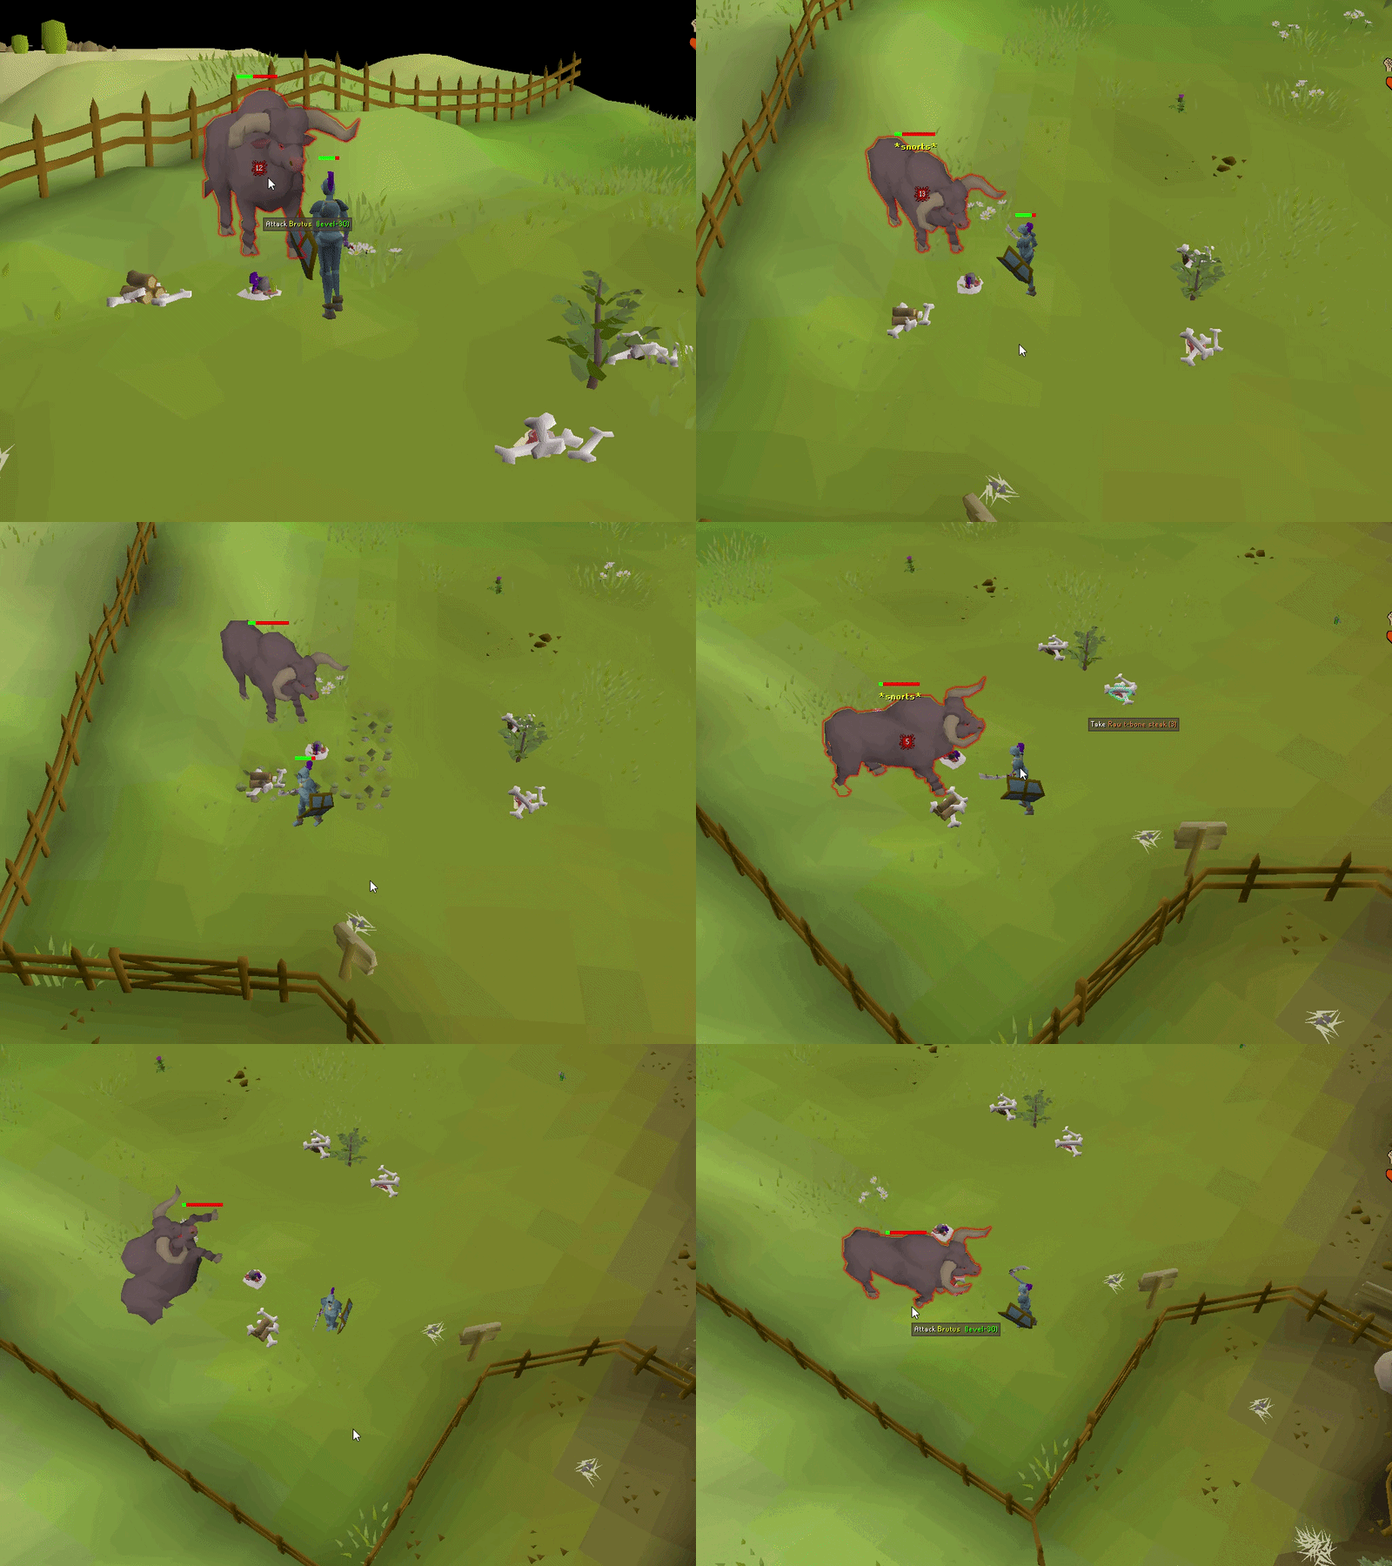
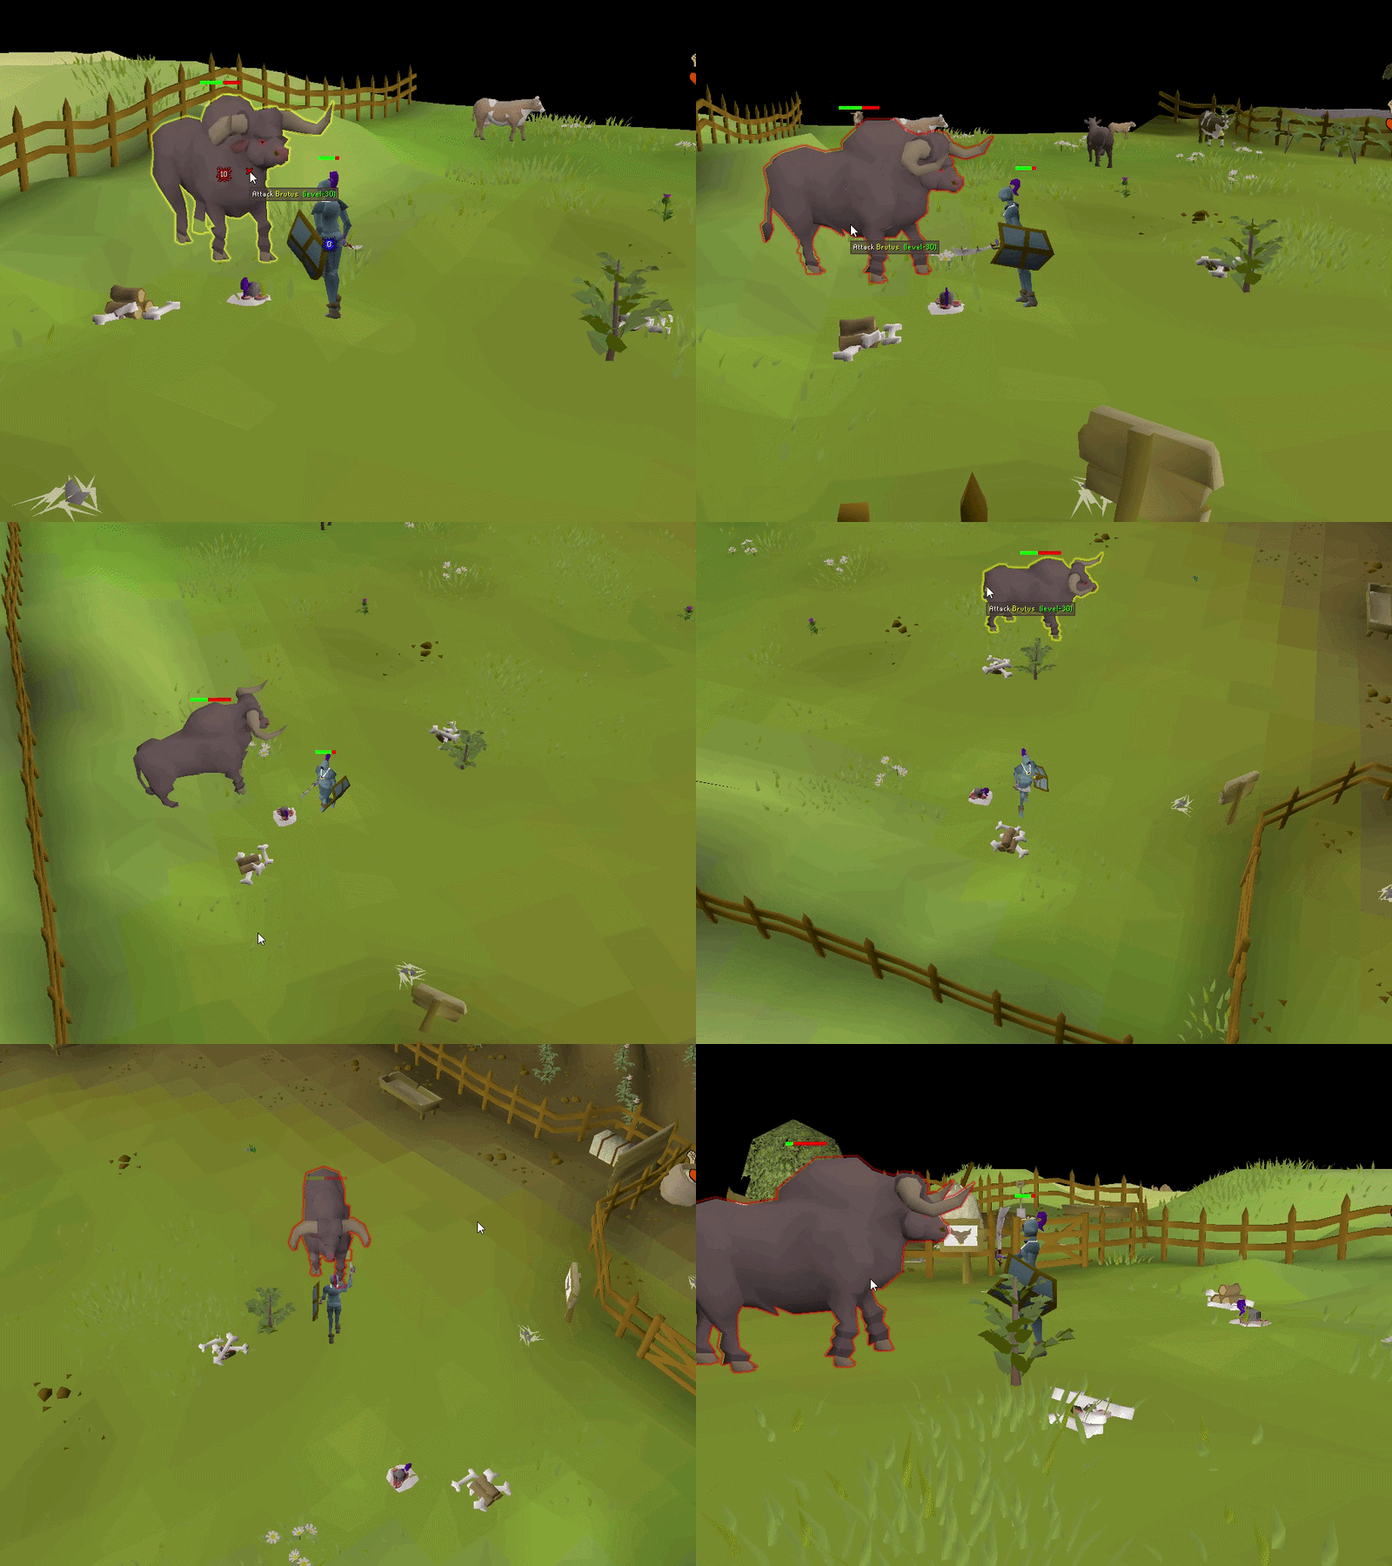
It drops Bull bones every time; you can bury them to get 40 Prayer XP. So, at low levels, you can also use those bones to increase your prayer levels.
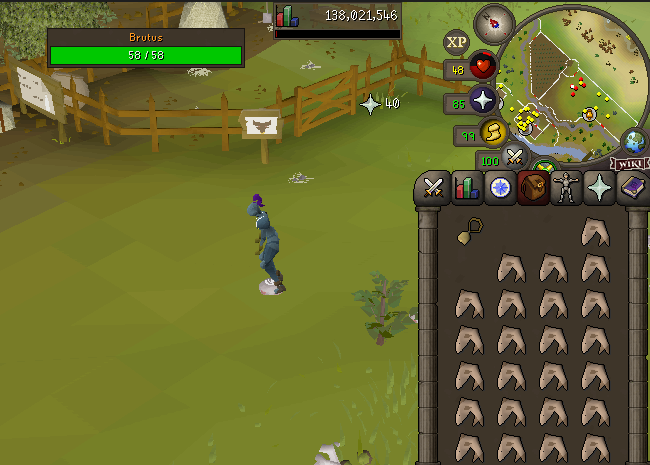
After completing the Ides of Milk quest, you’ll receive the Cowbell Amulet. You can use it to RING, and the Brutus's respawn time will be reduced from 21 seconds to 7 seconds.
Level 40-60: Crabs
- Requirement: None for Sand Crabs / Children of the Sun for Gemstone Crab
- XP/hr: ~20,000-80,000 depending on level and gear
- Teleportation Method: Hosidius Teleport (Sand) / Renu the bird to Tal Teklan (Gemstone)
After the quest stack, you'll be in the low 40s for Attack and lower for the others. It is the crab phase, reliable, low-risk, zero-attention AFK. And there's a newer crab that has completely changed this part of the game. You can choose between Brutus and Gemstone Crab. If you want a more active training session, consider Brutus; if you want to do it while AFK, Gemstone crab is the right choice.
Gemstone Crab: The New Best AFK Method
With the Varlamore expansion, the Gemstone Crab in the Tlati Rainforest is now the best AFK Melee spot for mid-level accounts. Why it beats the old crabs:
- 15-minute AFK window: 50% longer than Sand and Ammonite Crabs, which go passive at 10 minutes.
- Infinite HP: The crab never dies. Its health bar is just an activity timer. No overkill XP wasted, no respawn wait, no fighting for spawns.
- No world-hopping: When it relocates, a cave passage teleports you straight to the new spot.
- Scales to everyone: Unlimited players can train the same crab. You'll never get crashed.
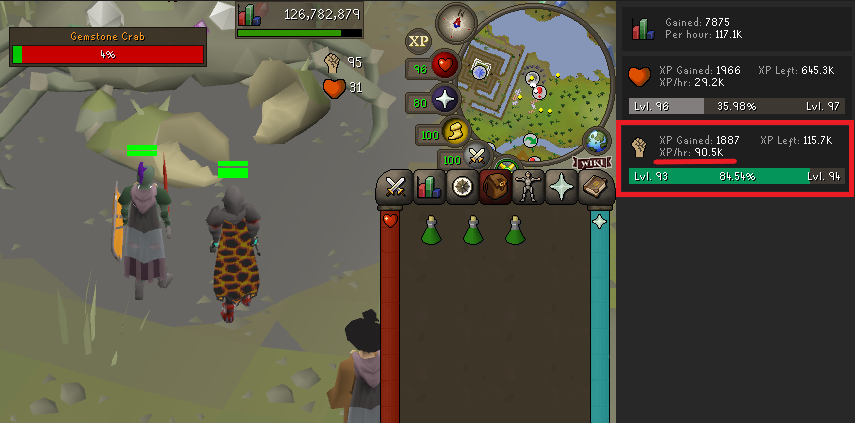
I tested it with an Obsidian set, Berserker Necklace, and Toktz-xil-ak at level 65 stats and averaged around 90k XP/hr with basically zero attention. Better than Ammonite Crabs at the same level, and no competition for a spot.
I'll keep it brief about the Gemstone crab, since we have a gemstone crab guide.
A Warning for HCIM at Gemstone Crab
If you're a Hardcore Ironman planning to train here with a Dharok's 1 HP max-hit setup, be very careful. Several HCIM accounts have lost their status at the Gemstone Crab. Some were genuine accidents; others were intentional once they became a community meme. Either way, never sit at 1 HP here on a Hardcore.
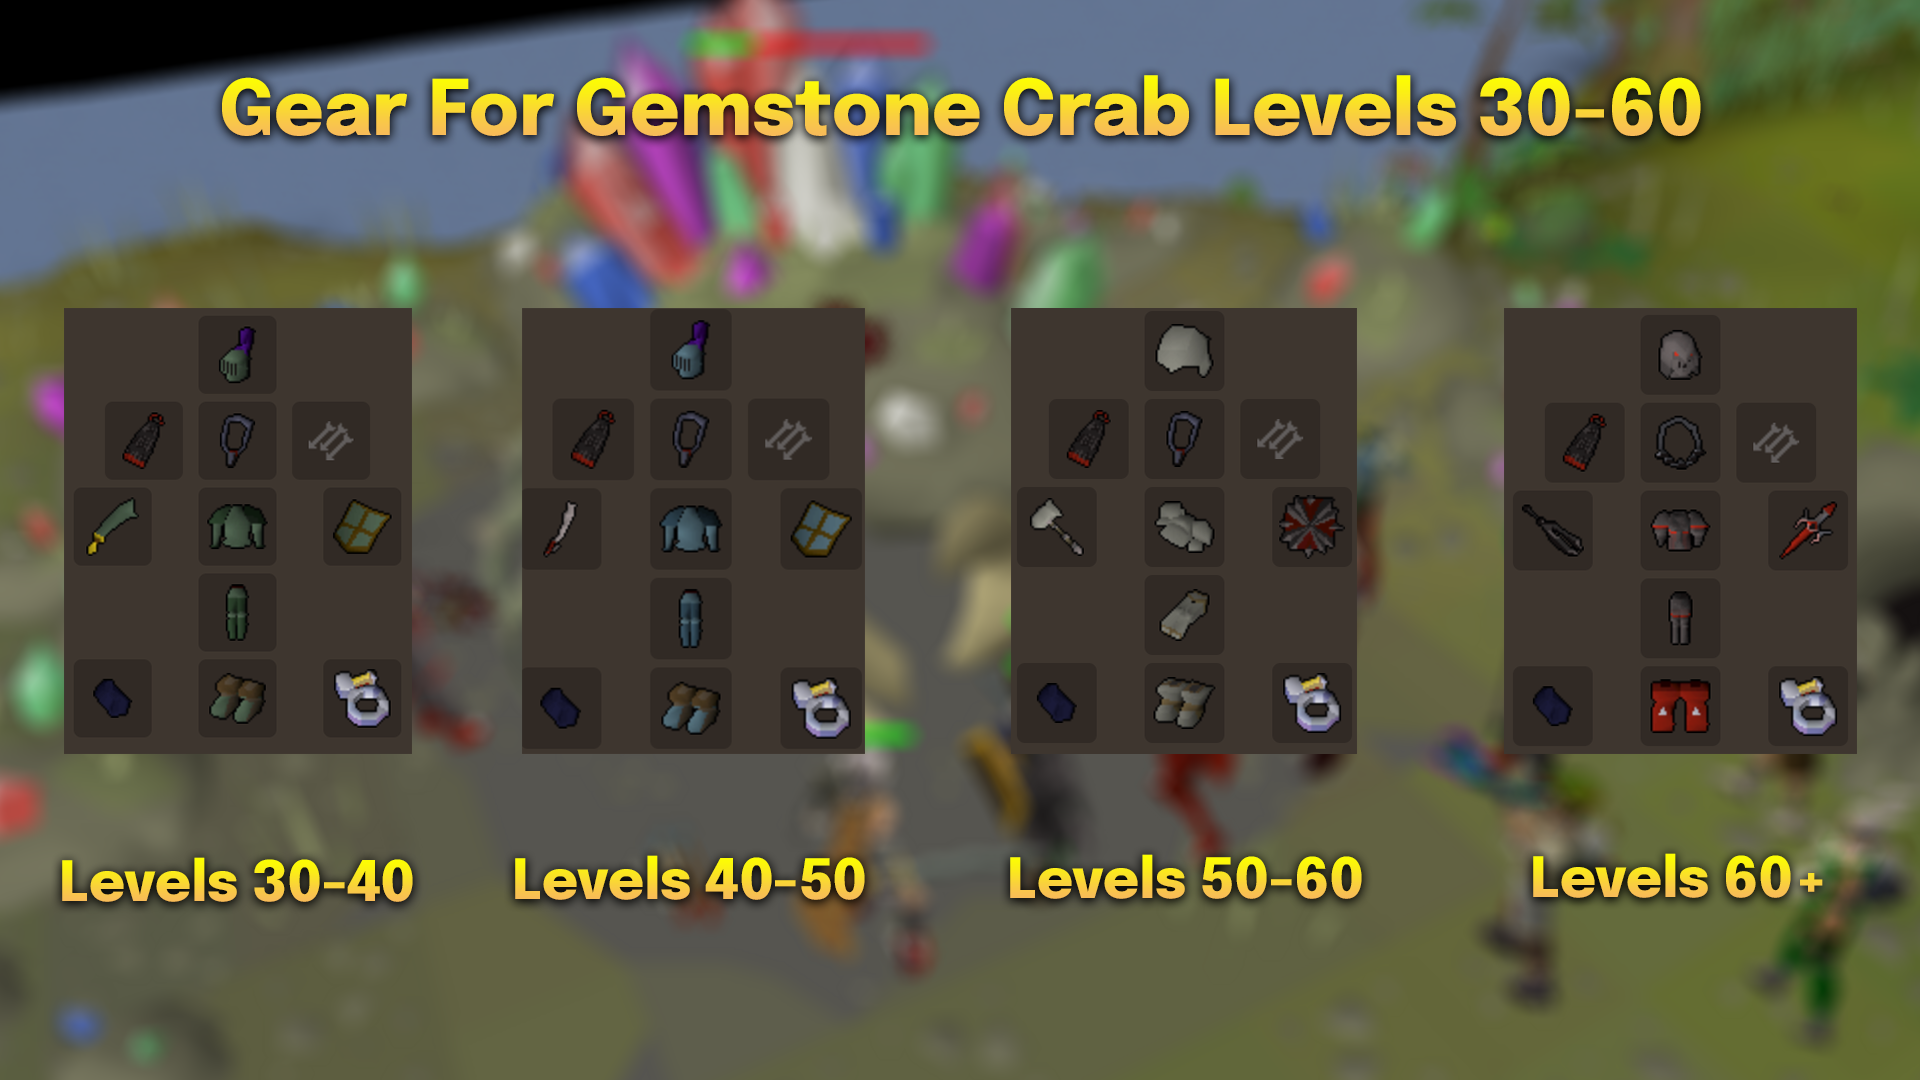
Gear Setup: Levels 30-60 at Crabs
Level | Weapon | Armour | Cape | Neck | Shield | Gloves | Ring |
30-40 | Adamant Scimitar | Adamant Armour | Obsidian Cape | Amulet of Fury | Adamant Kiteshield | Regen Bracelet | Berserker Ring |
40-50 | Brine Sabre | Rune Armour | Obsidian Cape | Amulet of Fury | Rune Kiteshield | Regen Bracelet | Berserker Ring |
50-60 | Granite Hammer | Granite Armour | Obsidian Cape | Amulet of Fury | Toktz-ket-xil | Regen Bracelet | Berserker Ring |
60+ | Dragon Scimitar (Monkey Madness I) / Toktz-xil-ak | Rune / Obsidian Armour | Obsidian Cape | Amulet of Fury / Berserker Necklace (Obsidian setup) | Dragon Defender | Regen Bracelet | Berserker Ring (i) |
For the 50-60 bracket, you can move on to Granite Armour with Granite Hammer, along with Toktz-ket-xil. If you can spend a couple of million GP, I would highly recommend the Amulet of Fury for a neck slot. PS, you can also use the Regen Bracelet for every setup because it can be used without any requirements at all. Also, use Brine Sabre instead of Rune Scimitar, because it is one of the best weapons in this level range.
Sand Crabs and Ammonite Crabs: The Fallbacks
If you don't have Varlamore access yet (no Children of the Sun), these are your backups.
- Sand Crabs: South coast of Hosidius, or pay 10,000 GP for the boat to Crabclaw Isle for less competition. 60 HP per crab, 10-minute timer. Around 15-30k XP/hr at levels 30-50. Check out the Sand Crabs Guide here.
- Ammonite Crabs: Fossil Island needs Bone Voyage. 100 HP per crab, about 66% more XP per kill than Sand Crabs (100 HP vs 60 HP). Same 10-minute mechanic. Around 30-40k XP/hr at 30-60. You can read more about Ammonite Crabs in our separate guide here.
For both, aggression resets when you walk roughly one minimap diameter away and return. Use the NPC Aggression Timer plugin in RuneLite; it shows the exact tile and countdown, so you never reset early.
Level 60-75: Scurrius The Rat King
- Requirement: None
- XP/hr: ~30k–70k/hr with standard weapons, 80k–120k /hr with the Bone Mace, up to 160K+ XP/hr at higher combat levels
- Teleportation Method: Varrock Teleport
Once Scurrius was released, it became one of the best early-game combat training methods in OSRS. Unlike Sand Crabs or Ammonite Crabs, you're actively fighting a boss instead of AFKing on low-level monsters. The XP rates are significantly higher, and you'll also learn mechanics you'll use later in PvM.
The biggest reason players train here isn't the loot; it's the Bone Mace.
The Bone Mace completely changes the XP rates at Scurrius. It grants a massive bonus to accuracy and damage against rats, allowing you to hit consistently even at relatively low combat levels. Once you obtain it, XP rates jump dramatically compared to using a Rune Scimitar, a Dragon Scimitar, or a Toktz-xil-ak.
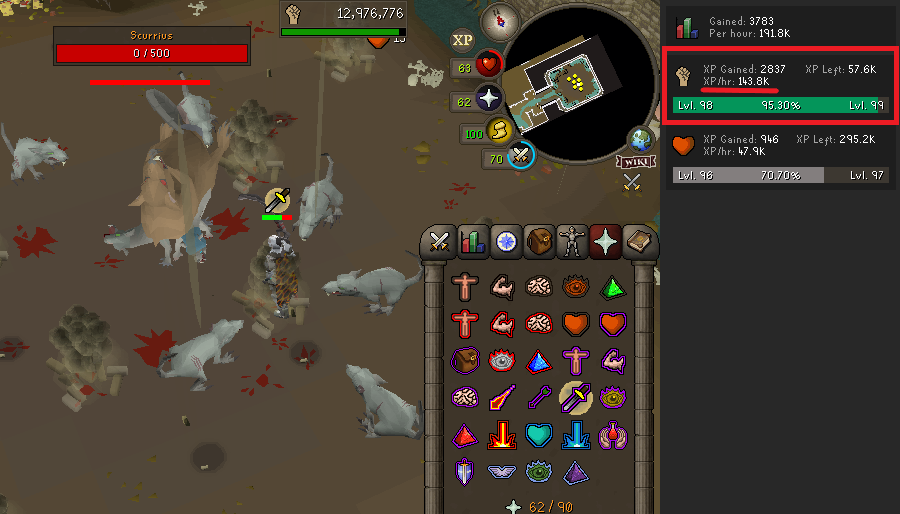
The above XP rates I achieved with my max gear.
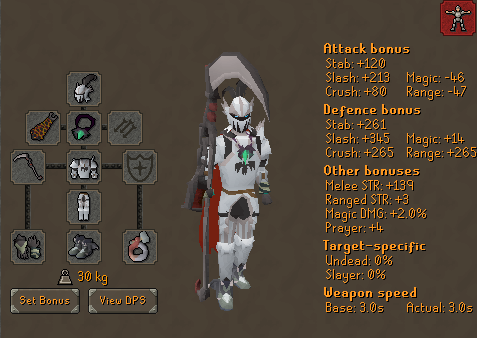
Mechanics
Scurrius is designed to introduce newer players to movement and prayer switching without being overwhelming.
During the fight, you'll encounter several mechanics.
- Tail Slam: Scurrius raises its tail, then slams it to the ground, simply move a few tiles away before the attack lands.
- Falling Debris: Chunks of rock fall from the ceiling and move out of the marked tiles.
- Rat Summons: Several giant rats spawn throughout the fight; kill these immediately. They have low Hitpoints and provide a large portion of your total XP/hr. Ignoring them slows both your kill speed and experience rates.
Prayer Switching
- Scurrius alternates attack styles.
- Watch its animations and switch between Protect from Melee, Missiles, or Magic accordingly.
- He eats his food after fighting with you for some time. During that time, he releases two kinds of effects from his Back. If it's a Gas (green), switch your prayer to Missiles; if the animation is Thunder (blue), switch your prayer to Magic.
How to Get to Scurrius?
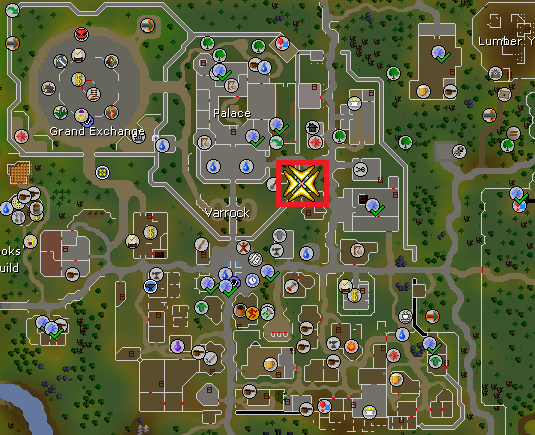
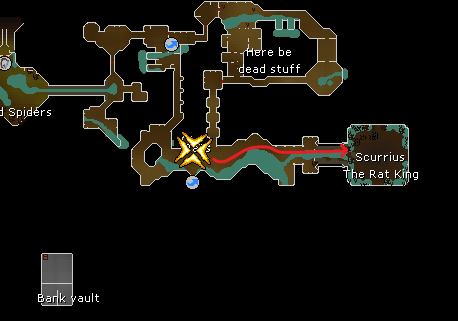
First, teleport to Varrock and reach the Sewers location as marked in the following image.
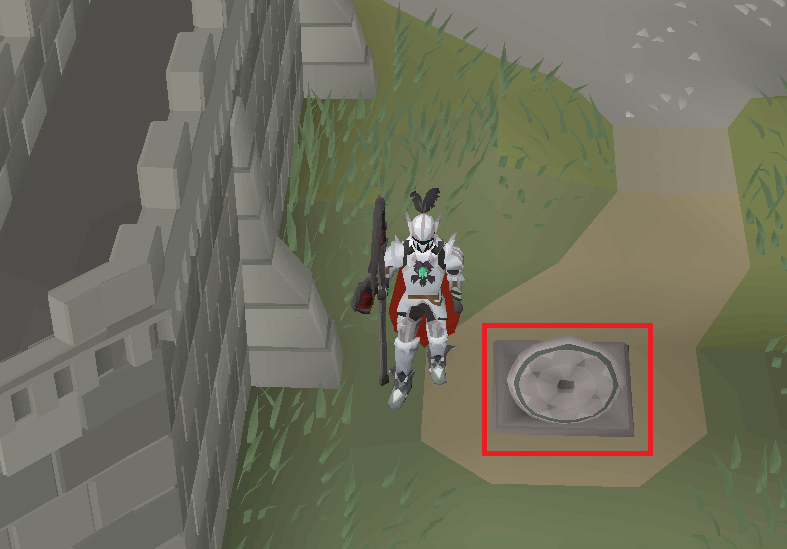
After reaching here, you’ll see a manhole; right-click it and select Climb Down to enter the sewers.
After entering the sewers, head east until you reach broken bars; it is where the Scurrius lives.
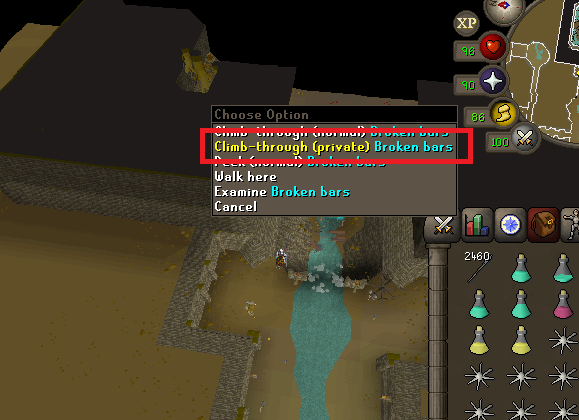
Right-click the broken bars and select “Climb-through (private)” to create a private instance with the Scurrius at 500 HP. You can also play with your friends here by creating a Normal instance that has 1500 HP.
It's a great method to train melee here due to a decent number of XP drops; the loot can be banked, and it's also a good money-making method at around 200K GP/hr. But among all the loot, the best thing is Scurrius’s Spine, which can be used to create a Bone Mace that boosts your XP even at lower levels.
Level 75-99: Sulphur Nagua
- Requirement: 48 Slayer, 38 Herblore (Moonlight Potions), 43 Prayer, Perilous Moons completion
- XP/hr: ~80k-170k
- Teleportation Method: Calcified Moth
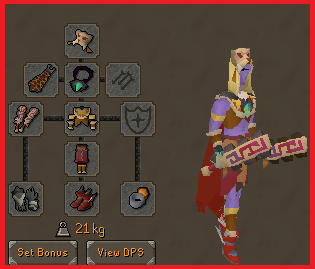
Sulphur Naguas in the Ancient Prison under Neypotzli take a -4 flat armour reduction on every hit, meaning each hit you land deals 4 extra damage. Multi-hit weapons are absurd here because the bonus applies to each hit separately. It's the best method for training melee, and it's a really good AFK method too. Just stand in the middle of the Son Icons, and they’ll spawn. You can see that I managed to get my XP rates up to 170K with the Blood Moon Set + Dual Macuahuitl.
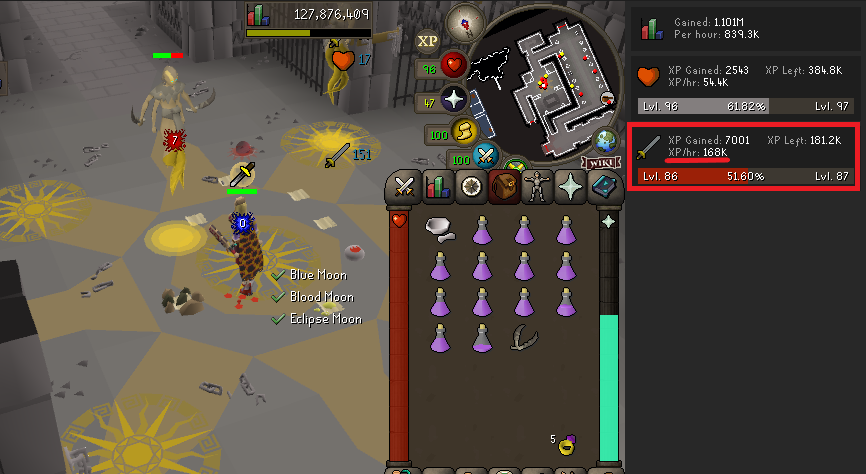
The bigger deal is that you can use Protect from Melee and take zero damage. They don't bypass it; they have no prayer-ignoring special; they melee you, and you block it all.
Location of Sulphur Naguas
After teleporting to the Cam Torum with Calcified Moth, you’ll reach the Cam Torum entrance and head north until you reach the Neypotzli.
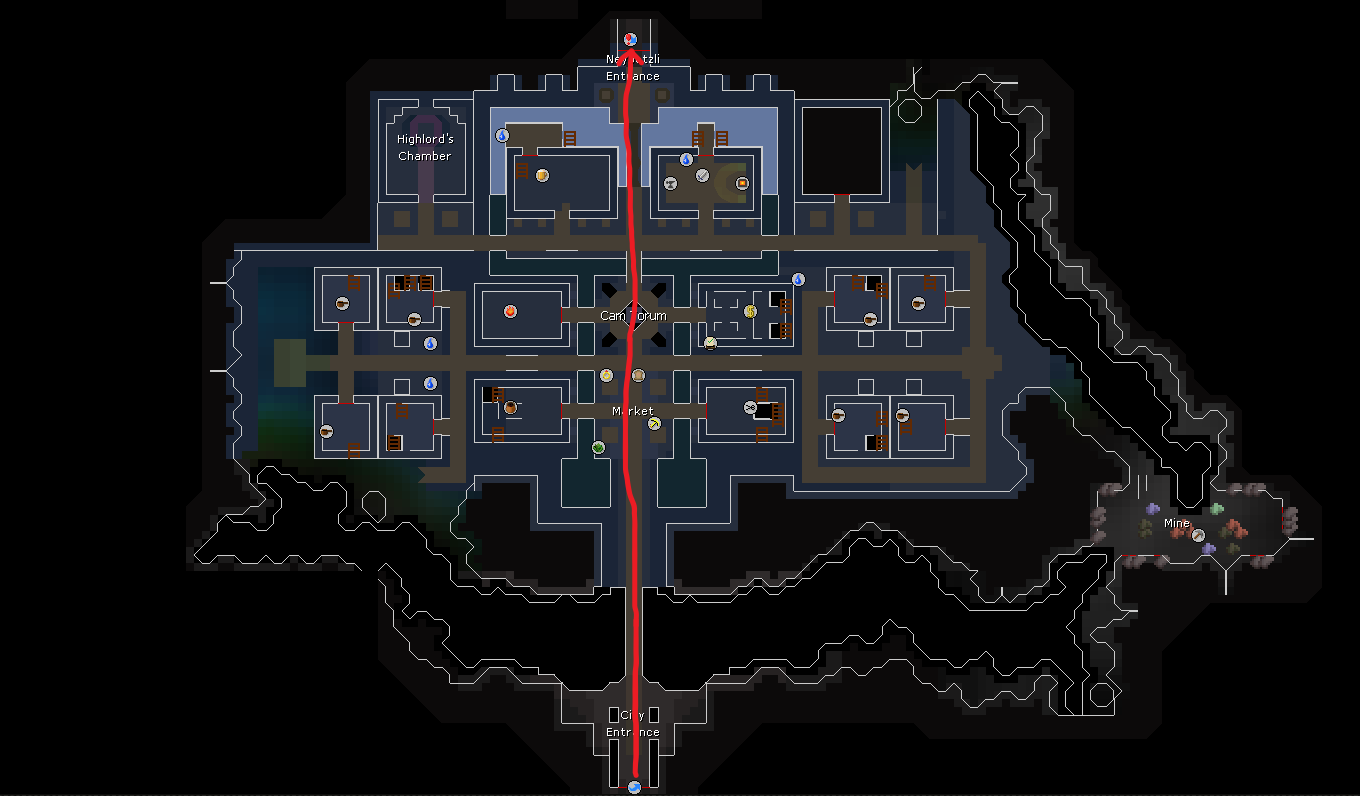
Use the following map markings to reach the Moonlight Grub location and make the Moonlight Potions at the cooking Icon on your minimap. To make Moonlight Potions, you only need 38 Herblore.
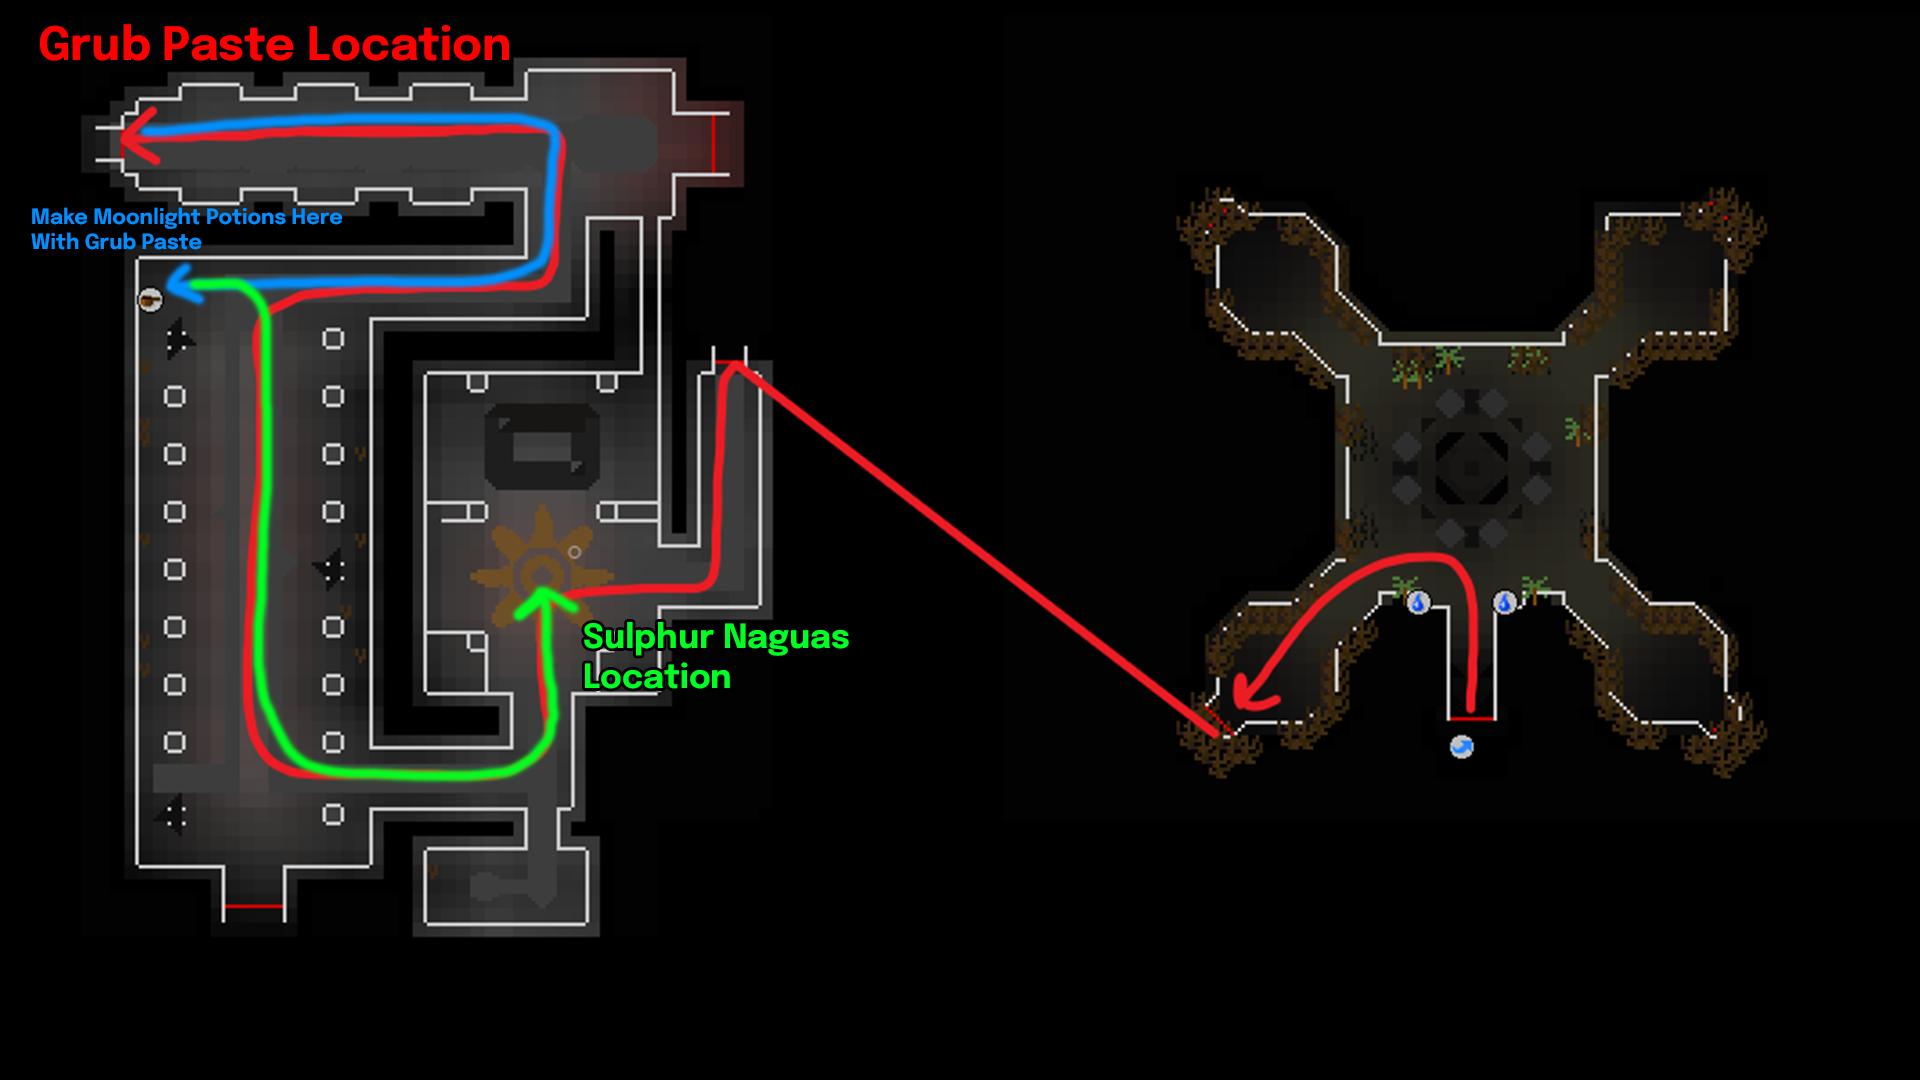
Fill your inventory with Moonlight Grub, then reach the Cooking Icon on your minimap to create Moonlight Potions.
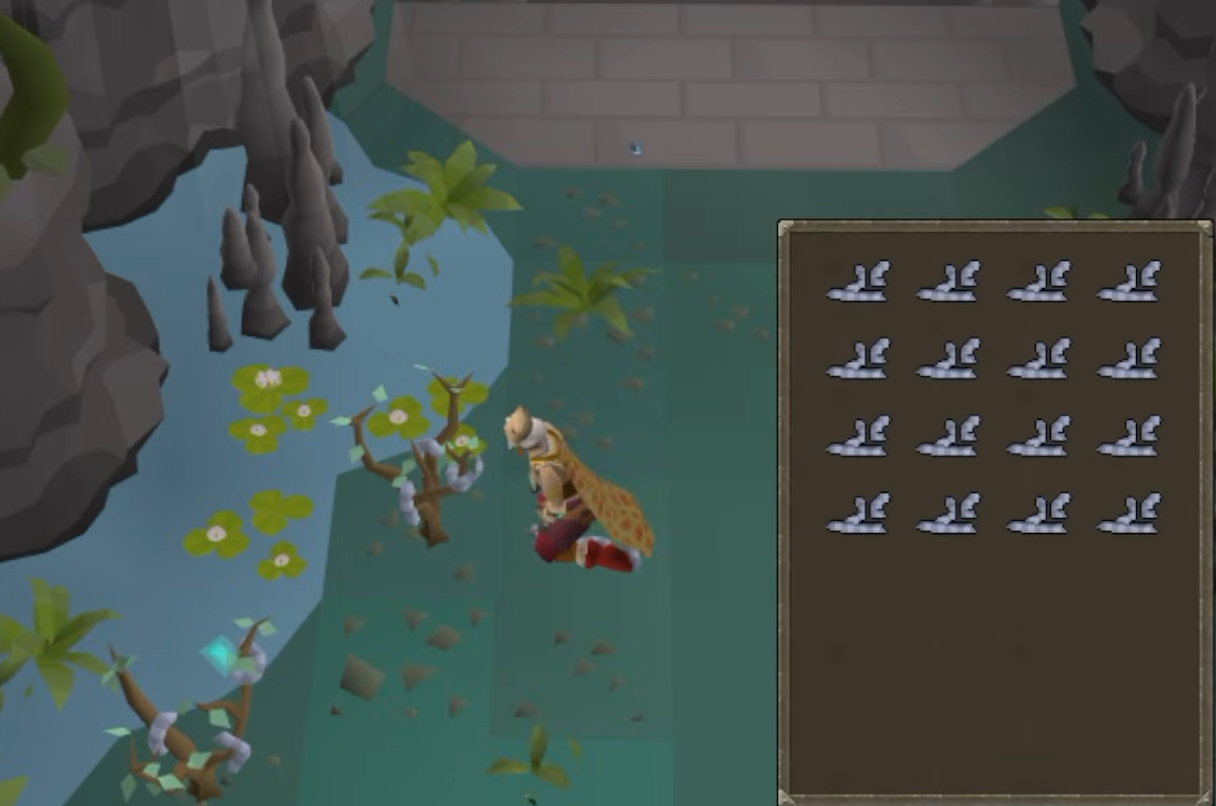
After reaching the Cooking icon on your minimap, get a Pestle and Mortar from the crate and create Grub Paste by using the Moonlight Grub on Pestle and Mortar.
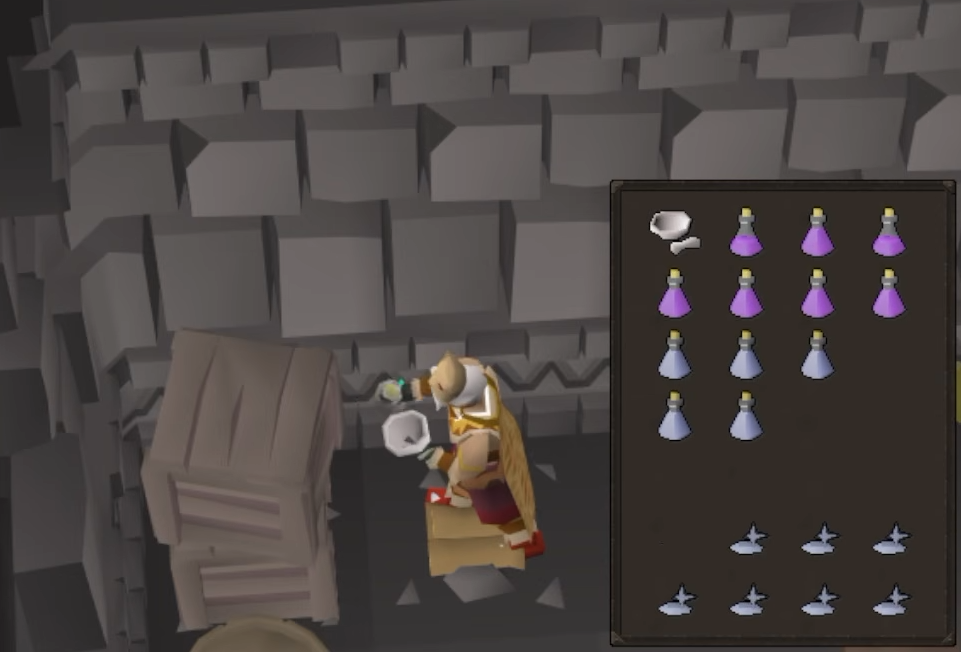
Now fetch 14 vials of water from the crates and keep 14 Grub Pastes to create 14x Moonlight Potions to fight with Naguas.
- XP breakdown: 80,000-110,000 combat XP/hr with mid-game stats and Moonlight Potions. Up to 140,000 with Piety. At 99/98 stats with Blood Moon and Dual Macuahuitl, around 170,000 XP/hr.
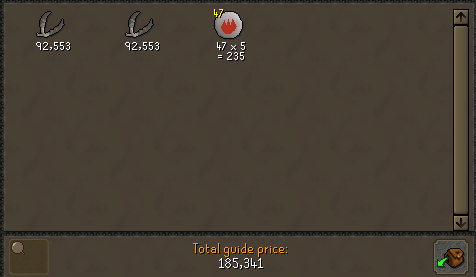
- Drops: Roughly 1-1.3 hard clues per hour, plus Brimstone Keys (Slayer task only) and Sulphur Blades. Drops are noted or stackable. I got 2 Sulphur Blades in about 10-15 Minutes of training here, as you can see my drops below.
Best Gear for Sulphur Naguas
- Blood Moon set + Dual Macuahuitl: the 33% chance to attack a tick early (Bloodrager effect), combined with the -4 armour reduction, is the best DPS combo here.
- Sunfire Fanatic pieces in the prayer slots to reduce prayer drain on Protect from Melee.
- Amulet of Torture, Ultor Ring, Barrows Gloves or Ferocious Glove(level 80), and Primordial Boots for the stat bonuses.
- On a budget: The Blood Moon Set + Dual Macuahuitl is recommended, and you can adjust the amulet and other slots to fit your budget.
Level 75-99: MM2 Chinning with Hallowfell
- Requirements: 75 Attack Level, Completion of Monkey Madness 2 Quest
- XP/hr: 250K - 300K
- Teleportation Method: Ape Atoll Teleport
From my experience, MM2 Chinning with Hallowfell is by far the fastest melee training method available once you reach 75 Attack and have completed Monkey Madness II. I managed to reach around ~250K XP/hr using Bandos armour, Primordial Boots, Ultor Ring, and an Amulet of Rancour, making it an extremely efficient way to train melee. With a full Torva set and other best-in-slot gear, you can push the rate to 300K+ XP/hr with a more optimised setup.
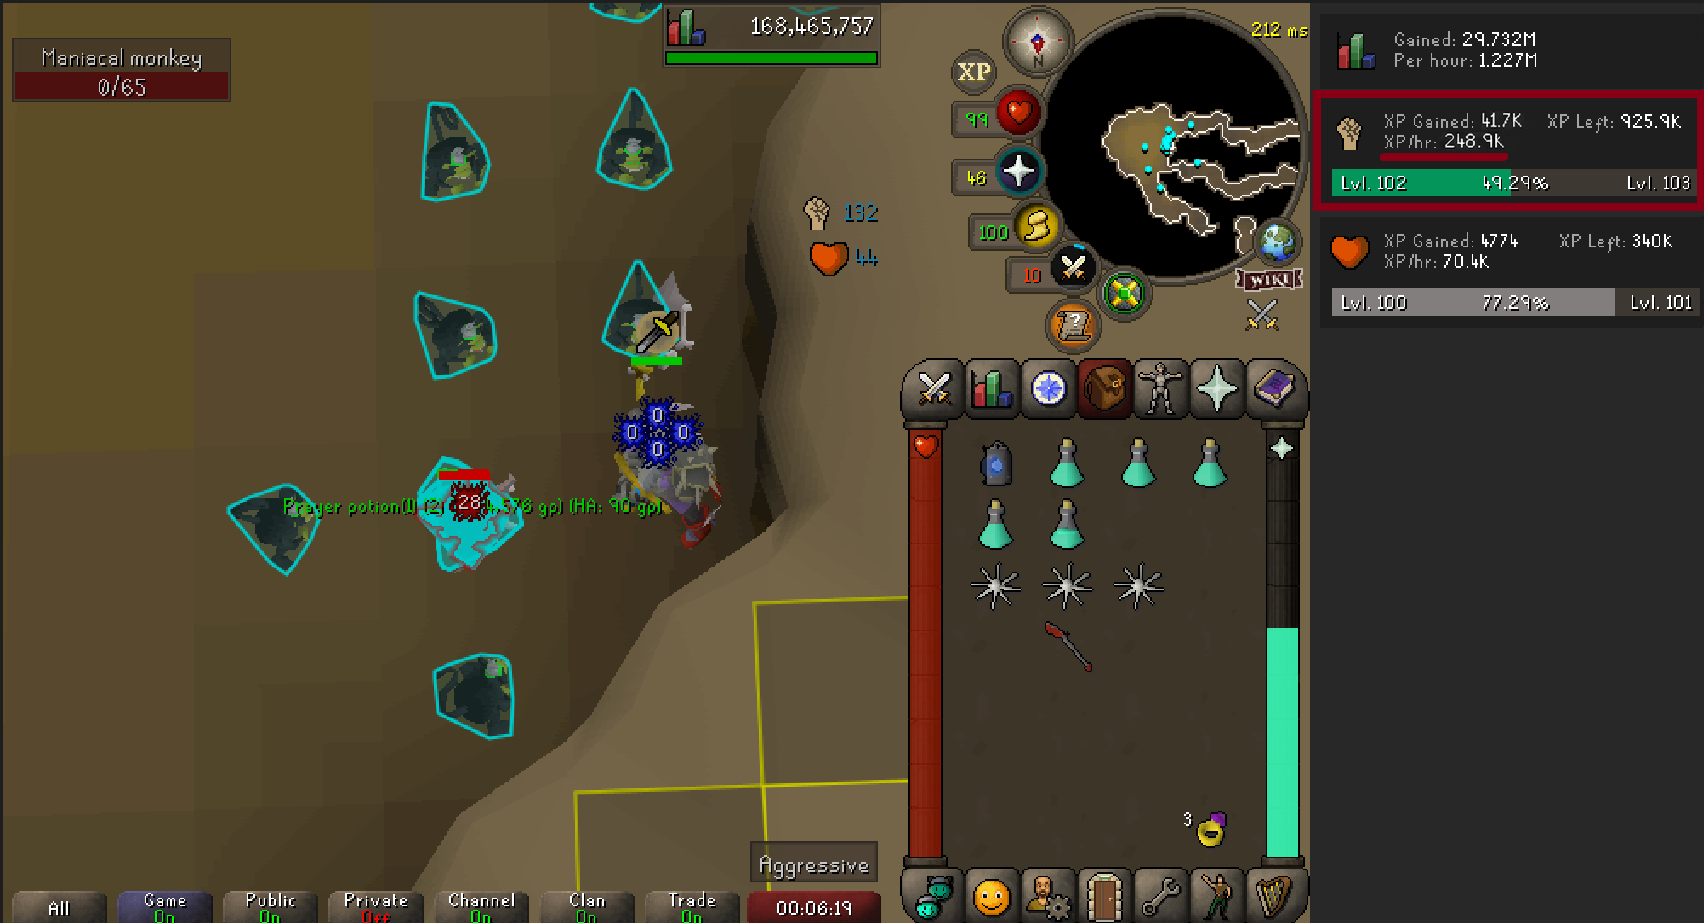
Hallowfell's ability to hit multiple Maniacal Monkeys at once makes it particularly effective in the tightly packed MM2 tunnels, allowing you to gain huge amounts of XP with every attack. For players looking to push from 75 to 99 Attack, this is easily one of the most efficient methods to prioritise, although it requires completion of Monkey Madness II and a strong melee setup to achieve the highest rates.
Note: To reach 250k-300K XP/hr, you also need a special attack weapon such as a Dragon Halberd or Crystal Halberd. For this guide, I used a Dragon Halberd.
Gear Setup and Inventory
The following is the gear I used for this guide, along with a minimal inventory setup including prayer potions, some food, and a Lantern.
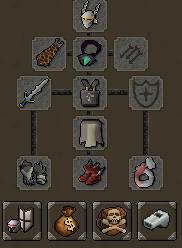
Gear Setup for Hallowfell Chinning at MM2 |
Head Slot | Neitiznot faceguard |
Cape Slot | Infernal Cape |
Neck Slot | Amulet of Rancour |
Weapon Slot | Hallowfell |
Body Slot | Bandos Chestplate |
Legs Slot | Bandos Tessets |
Feet Slot | Primordial Boots |
Hands Slot | Ferocious Gloves |
Ring Slot | Ultor Ring |
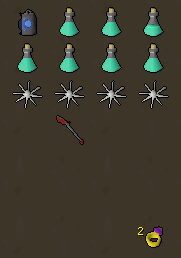
The above is the inventory setup; keep enough prayer potions and some food (2-4 is more than sufficient), a Dragon or Crystal Halberd, a Lantern and a Ring of Wealth or a House Teleport (For teleporting to GE or House for supplies).
Training Melee at Nightmare Zone
If you want to train melee with good XP rates while AFK, the Nightmare Zone is the best option. The following are the 3 strategies I’ve included in this guide for you guys to learn from.
Level 50-70: Nightmare Zone: Normal Rumble
- Requirement: At least 5 quest bosses unlocked (see quest list above), Yanille area access
- XP/hr: ~50k-75k
- Teleportation Method: Minigame Teleport: Nightmare Zone
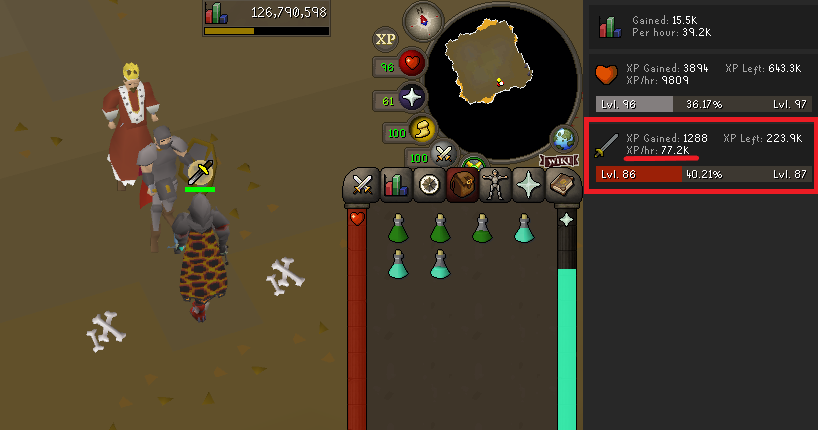
At level 50, you have enough quest bosses unlocked to enter the Nightmare Zone. This is earlier than most players expect. I made the mistake of grinding Crabs to 65 before switching on one account, which meant around 15 hours of slower XP I didn't need. Once you hit 50 in both, go.
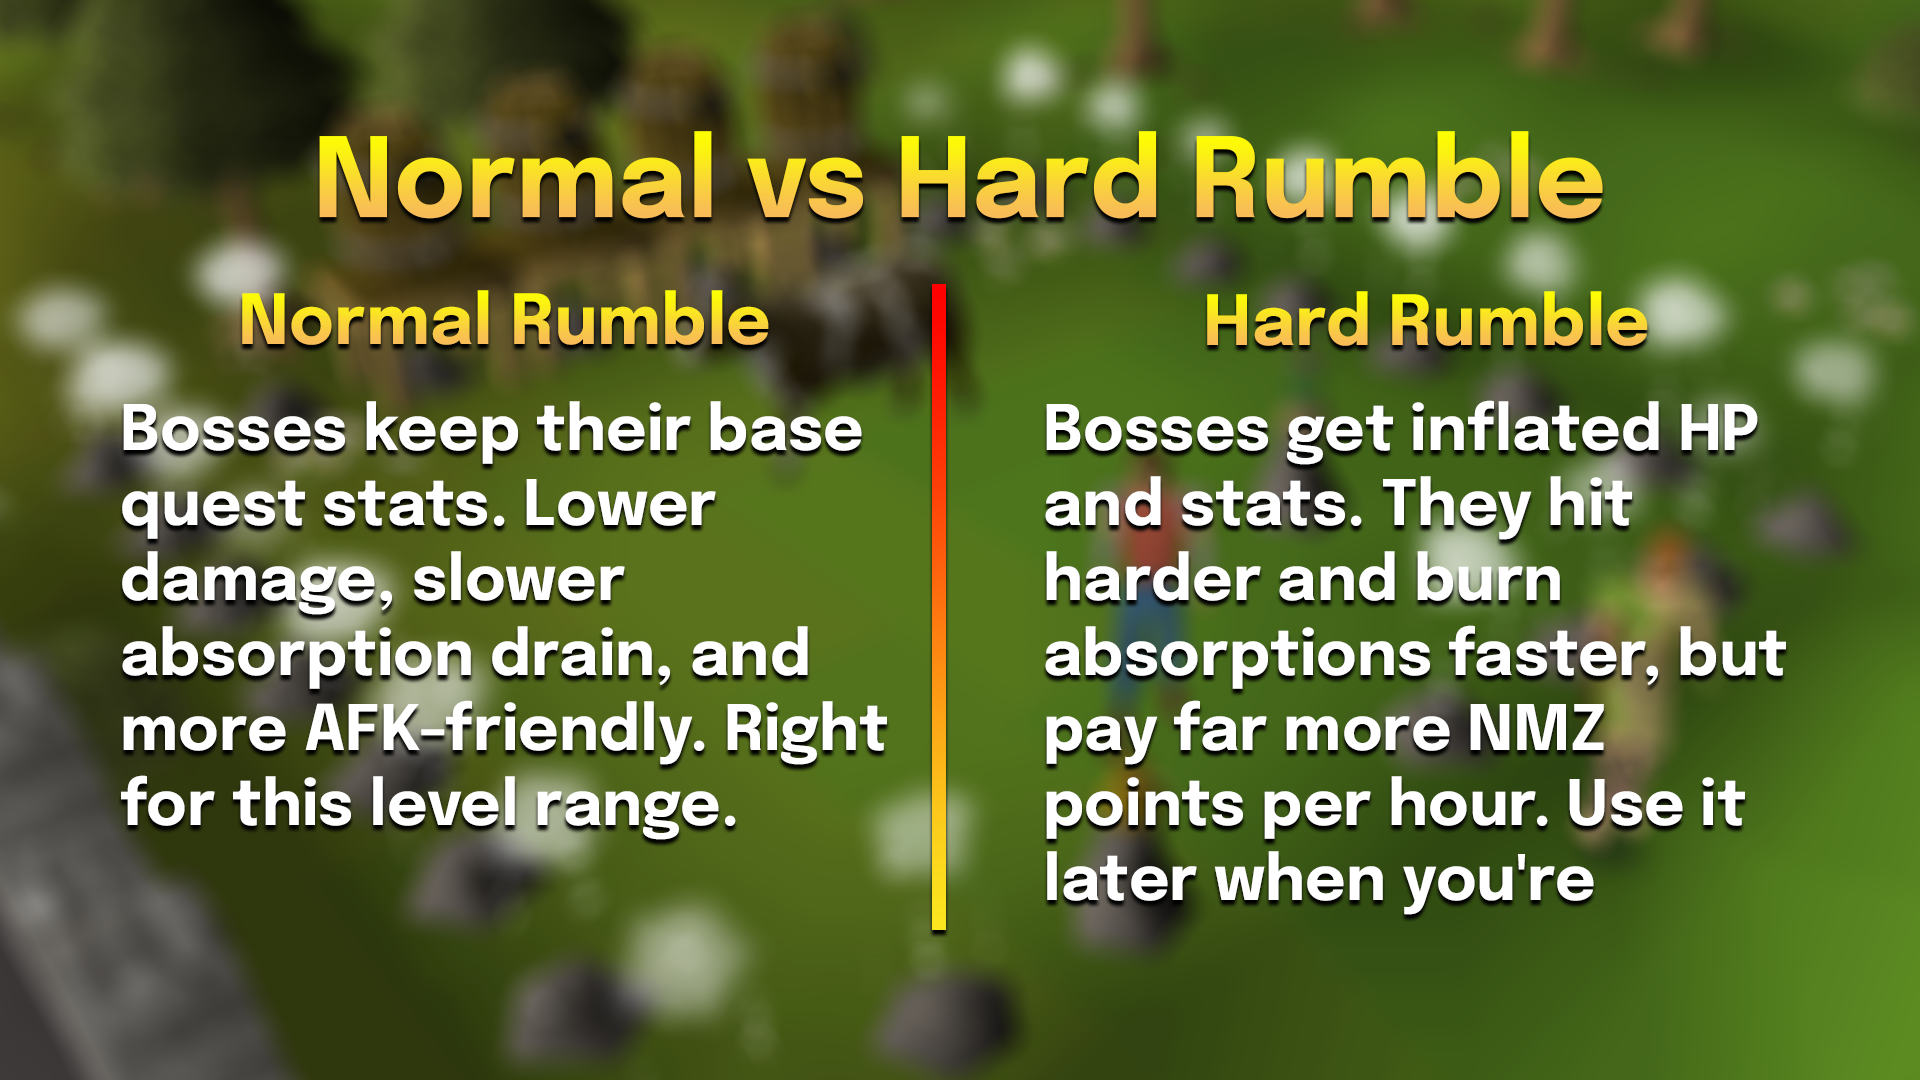
Normal vs Hard Rumble
- Normal Rumble: Bosses keep their base quest stats. Lower damage, slower absorption drain, and more AFK-friendly. Right for this level range.
- Hard Rumble: Bosses get inflated HP and stats. They hit harder and burn absorptions faster, but pay far more NMZ points per hour. Use it later when you're farming imbues.
Best Bosses for 50-70 NMZ
You want melee-only bosses with no specials that drain absorptions unexpectedly:
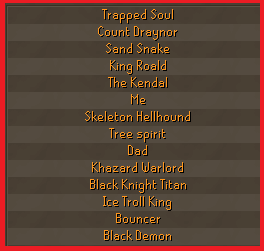
- Count Draynor (Vampyre Slayer): reliable, melee only
- King Roald (What Lies Below): reliable, melee only
- The Kendal (Mountain Daughter): reliable, good XP per boss
- Khazard Warlord (Tree Gnome Village): reliable
- Me (Lunar Diplomacy)
- Tree Spirit (Lost City)
NOTE: Don't enable Glod, Elvarg, Chronozon, Corrupt Lizardman, Barrelchest, Flambeed, or Slagilith at this level. They use non-melee attacks or specials that drain absorptions faster than normal.
Absorption Potion Strategy
This is what makes NMZ near-infinite AFK. When set up correctly, you can leave a 15-20-minute gap between checks.
Here's the mechanic most guides skip explaining: absorption potions soak all incoming damage, not your HP. Every point of damage an enemy deals instead comes from your absorption pool. So why drop to 1 HP? Because the lower your HP, the lower an enemy's max hit against you at 1 HP, they can only hit a maximum of 1. Instead of soaking a 30 and losing 30 absorption, you soak a 1 and lose 1. That's what stretches a single 1,000-point absorption stack across 15-20 minutes instead of a couple of minutes.
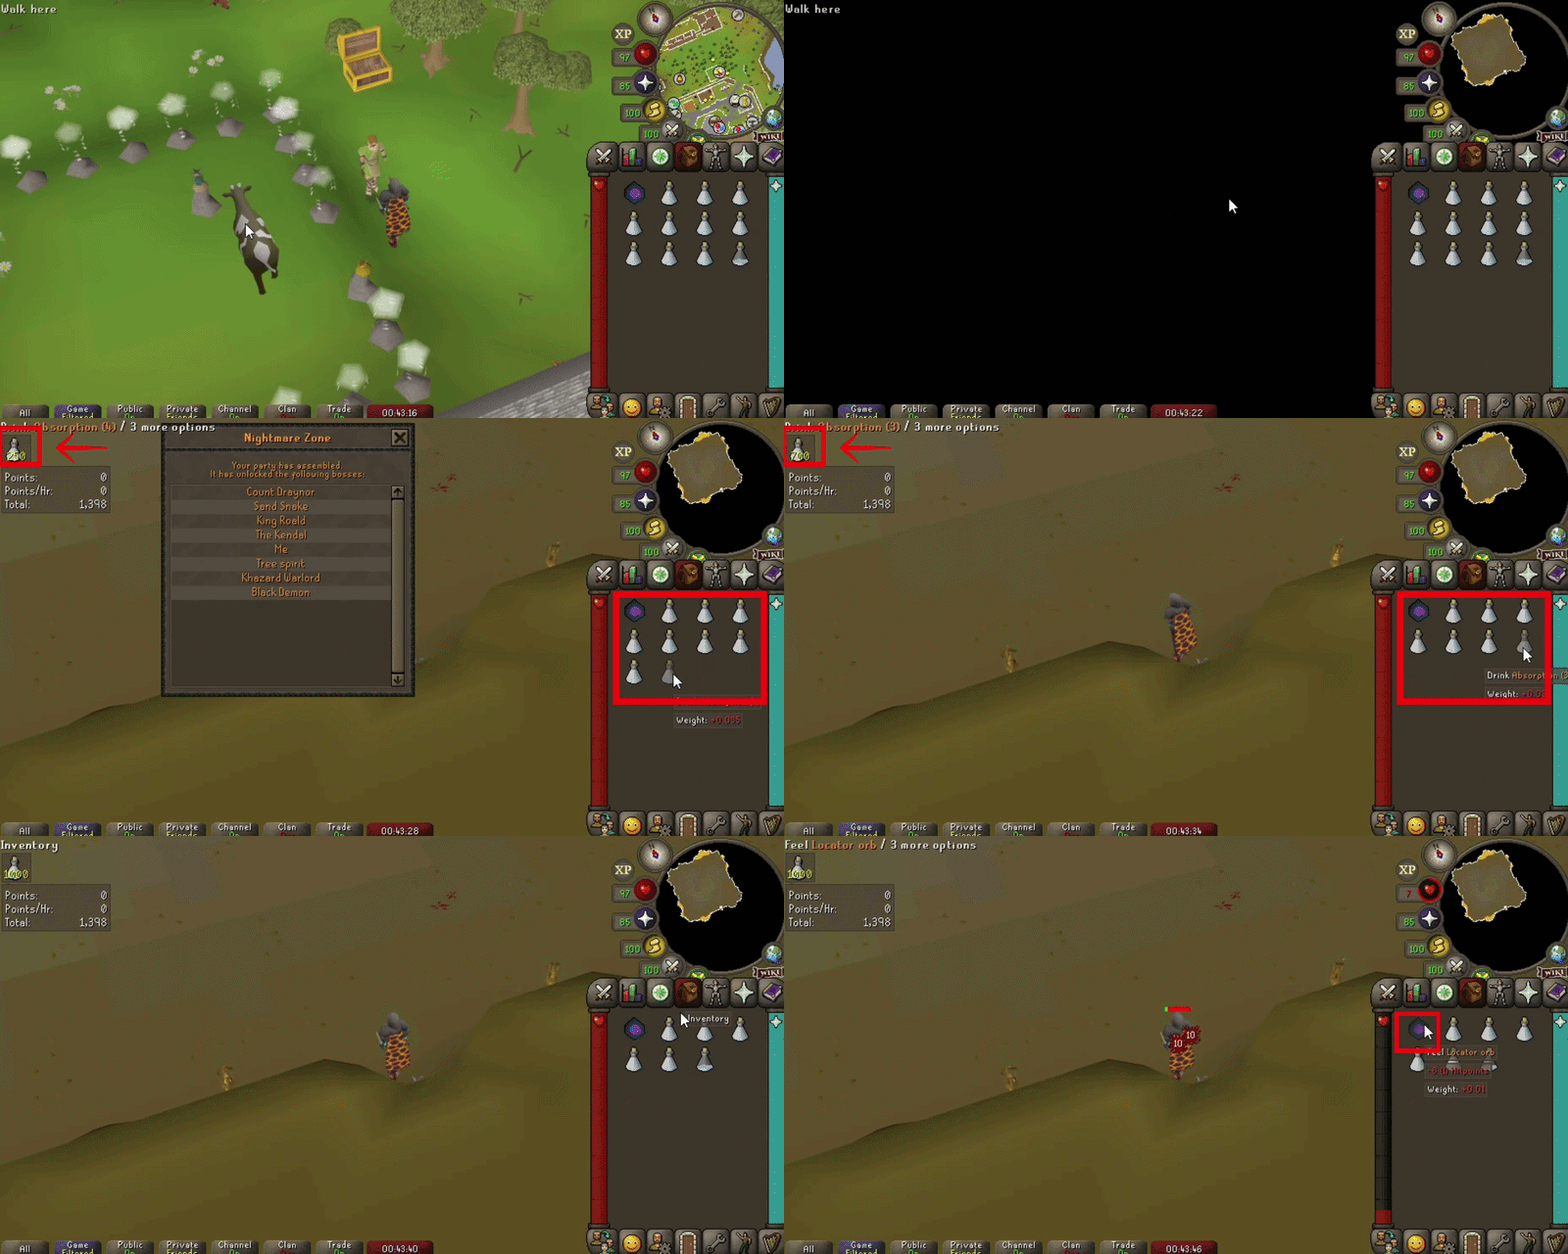
The steps:
- Enter the dream during the 25-second countdown.
- Drink your first Absorption dose. Stack up to 1,000 points; anything over 1,000 is wasted. That's the hard cap.
- Use the Locator Orb to drop to 1 HP.
- Flick Rapid Heal Prayer on, then off once every 50-60 seconds to reset the HP regen timer. This keeps you at 1 HP indefinitely.
- Auto-retaliate on. Stand in a non-southeast corner so the boss's path away is clear.
- Set a 20-minute timer to refill absorptions and check HP.
For a better understanding, check out the GIF below.
At this level range, you're doing all of this with a normal weapon, Granite Hammer, Dragon Scimitar, or Obsidian. You're not at 1 HP for damage here; you're at 1 HP purely to make your absorptions last. (That changes at 70+ when Dharok turns the missing HP into a damage bonus, too, more on that in the next section.)
The Rock Cake comes from Recipe for Disaster: Freeing the Mountain Dwarf (only that subquest is required). The Locator Orb, post-Dragon Slayer II, is cleaner. It deals exactly 10 damage per click, so at 11 HP, you click once and land on 1 with no RNG. Most veterans use the Orb once they have it.
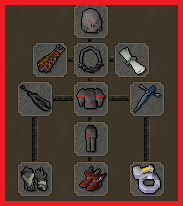
Gear for 50-70 NMZ
Slot | Mid Gear (50-70) | Budget Gear |
Helmet | Helm of Neitiznot / Obsidian Helmet | Berserker Helm / Rune Full Helm |
Amulet | Amulet of Fury / Berserker Necklace | Amulet of Glory |
Cape | Fire Cape / Ardougne Cloak 3+ | Skill Cape / Ardougne Cloak |
Body | Fighter Torso / Obsidian Body | Rune Platebody |
Legs | Dragon Platelegs / Obsidian Platelegs | Rune Platelegs |
Weapon | Dragon Scimitar / Toktz-xil-ak | Rune Scimitar / Dragon Scimitar |
Shield | Dragon Defender | Rune Defender / Kiteshield |
Gloves | Barrows Gloves / Combat Bracelet | Combat Bracelet |
Boots | Dragon Boots | Climbing Boots / Rune Boots |
Ring | Berserker Ring (i) | Ring of Suffering (i) |
This is the gear that I’m using for this guide.
Level 70-99: Nightmare Zone: Hard Rumble and Dharoking
- Requirement: 70+ Att/Str/Def, 92+ Hitpoints recommended for Dharok method
- XP/hr: ~80,000-150,000 per stat at high levels, depending on gear
- Teleportation Method: Minigame Teleport / Yanille
Level 70 is where NMZ changes gear entirely. You get the Abyssal Whip at 70 Attack, better armour, and if you've been banking NMZ points, your Berserker Ring should be imbued. This is when NMZ goes from a decent AFK method to one of the best XP rates in the game.
The Dharok's NMZ Method
Dharok's set effect raises your max hit based on missing HP. At 1 HP with 99 Hitpoints, that's roughly a 97% bonus to your max hit. Pair that with Absorption Potions that soak all incoming damage at 1 HP, and you get the highest consistent Melee XP in the game, aside from a few niche cases.
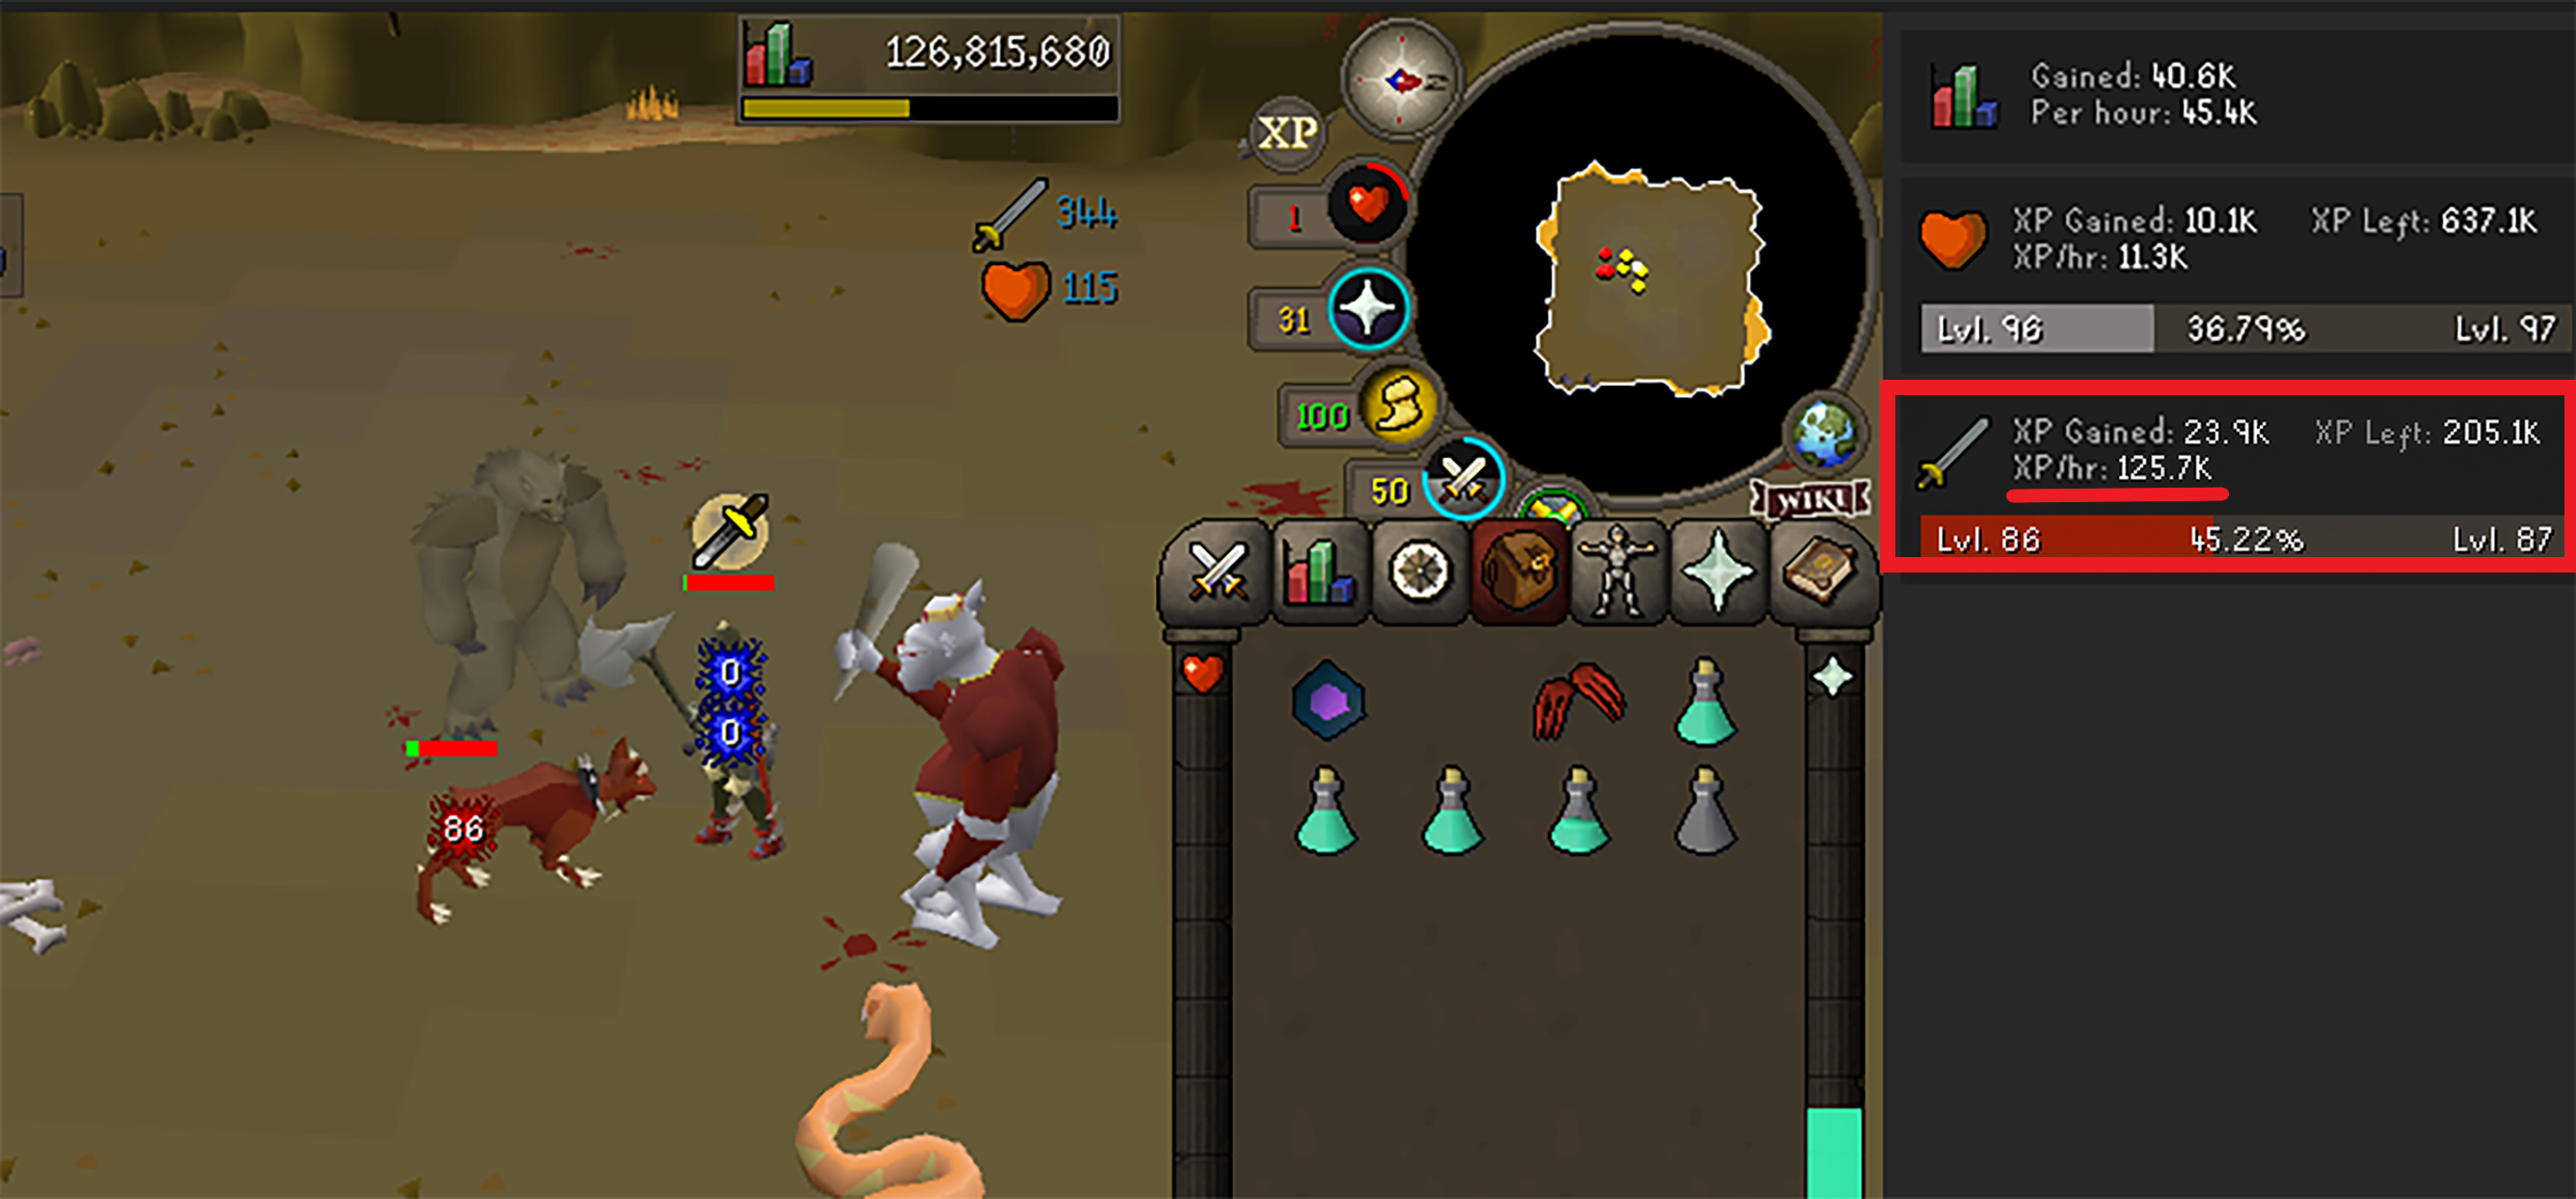
The setup is the same absorption method as before, except now you're wearing Dharok's Greataxe, Helm, Platebody, and Platelegs. At 1 HP, the greataxe regularly hits 50-70+ on standard NMZ bosses, and that translates straight into XP.
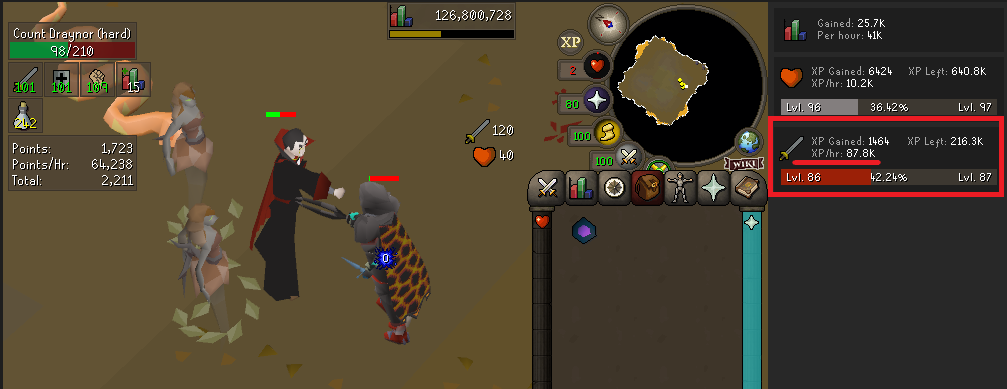
As you can see, my XP rates from Dharok’s setup have reached 125K.
Gear for 70-99 NMZ (Dharok's Setup)
For this setup, always choose your BIS gear. If you can spend money, then you must have Ferocious Gloves, Avernic Treads or Primordial Boots. Always purchase the Best-in-Slot gear. Infernal Cape is really hard to obtain (even for experienced players). If you want to outsource this, you can choose to order our OSRS Infernal Cape service instead.
Slot | Item |
Helmet | Dharok's Helm |
Amulet | Amulet of Fury or Amulet of Torture/Amulet Rancour at Above Levels |
Cape | Infernal Cape > Fire Cape > Obsidian Cape |
Body | Dharok's Platebody |
Legs | Dharok's Platelegs |
Weapon | Dharok's Greataxe (1HP) + Dragon Claws |
Gloves | Barrows Gloves or BIS gloves |
Boots | Dragon Boots or Bandos Boots < Avernic Treads < Primordial Boots |
Ring | Berserker Ring (i) |
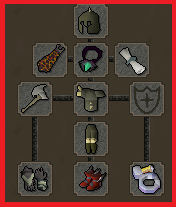
The set effect needs all four of Dharok's pieces; it doesn't work partially. Repair your Dharoks at Bob in Lumbridge before each long session, or they will lose their effect. A House Armour Stand at 55+ Smithing is cheaper per repair than Bob.
XP Rates by Tier (70-99 NMZ)
Setup | Gear | XP/hr |
Whip AFK, Normal Rumble | Rune/Bandos + Whip + Absorption | ~60,000-75,000 |
Whip AFK, Normal (Obsidian set) | Obsidian + Toktz-xil-ak + Berk Neck | ~70,000-85,000 |
Dharok 1-HP, Absorption | Dharok's full set + Overloads | ~90,000-110,000 |
Dharok 1-HP, Hard Rumble + Spec | Dharok's + Dragon Claws spec | ~120,000-150,000 |
NOTE: The 150k ceiling is only realistic at 90+ Hitpoints with active Dragon Claws Power Surge cycles and high combat stats. In the 70-80 range, expect for 90k-100k and work up from there. Dharok itself isn't worth using below 90 HP; see the mistakes section.
My Honest Opinion on NMZ
NMZ is the best purely AFK Melee XP in the game. The Dharok setup, once it's running, lets you go AFK for 15-20 minutes, come back, refill absorptions, sip an overload, and find that you gained 40,000+ XP while you did nothing.
The downside: it costs GP and gives no drops. One way to offset the cost is herb boxes — you can buy 15 per day from the rewards chest, averaging around 190k in herbs, which goes a long way toward covering your Overload and Absorption supplies. If you want XP and money together, use the alternate methods below instead.
Level 75-99: Dinh's Bulwark Energy Transfer
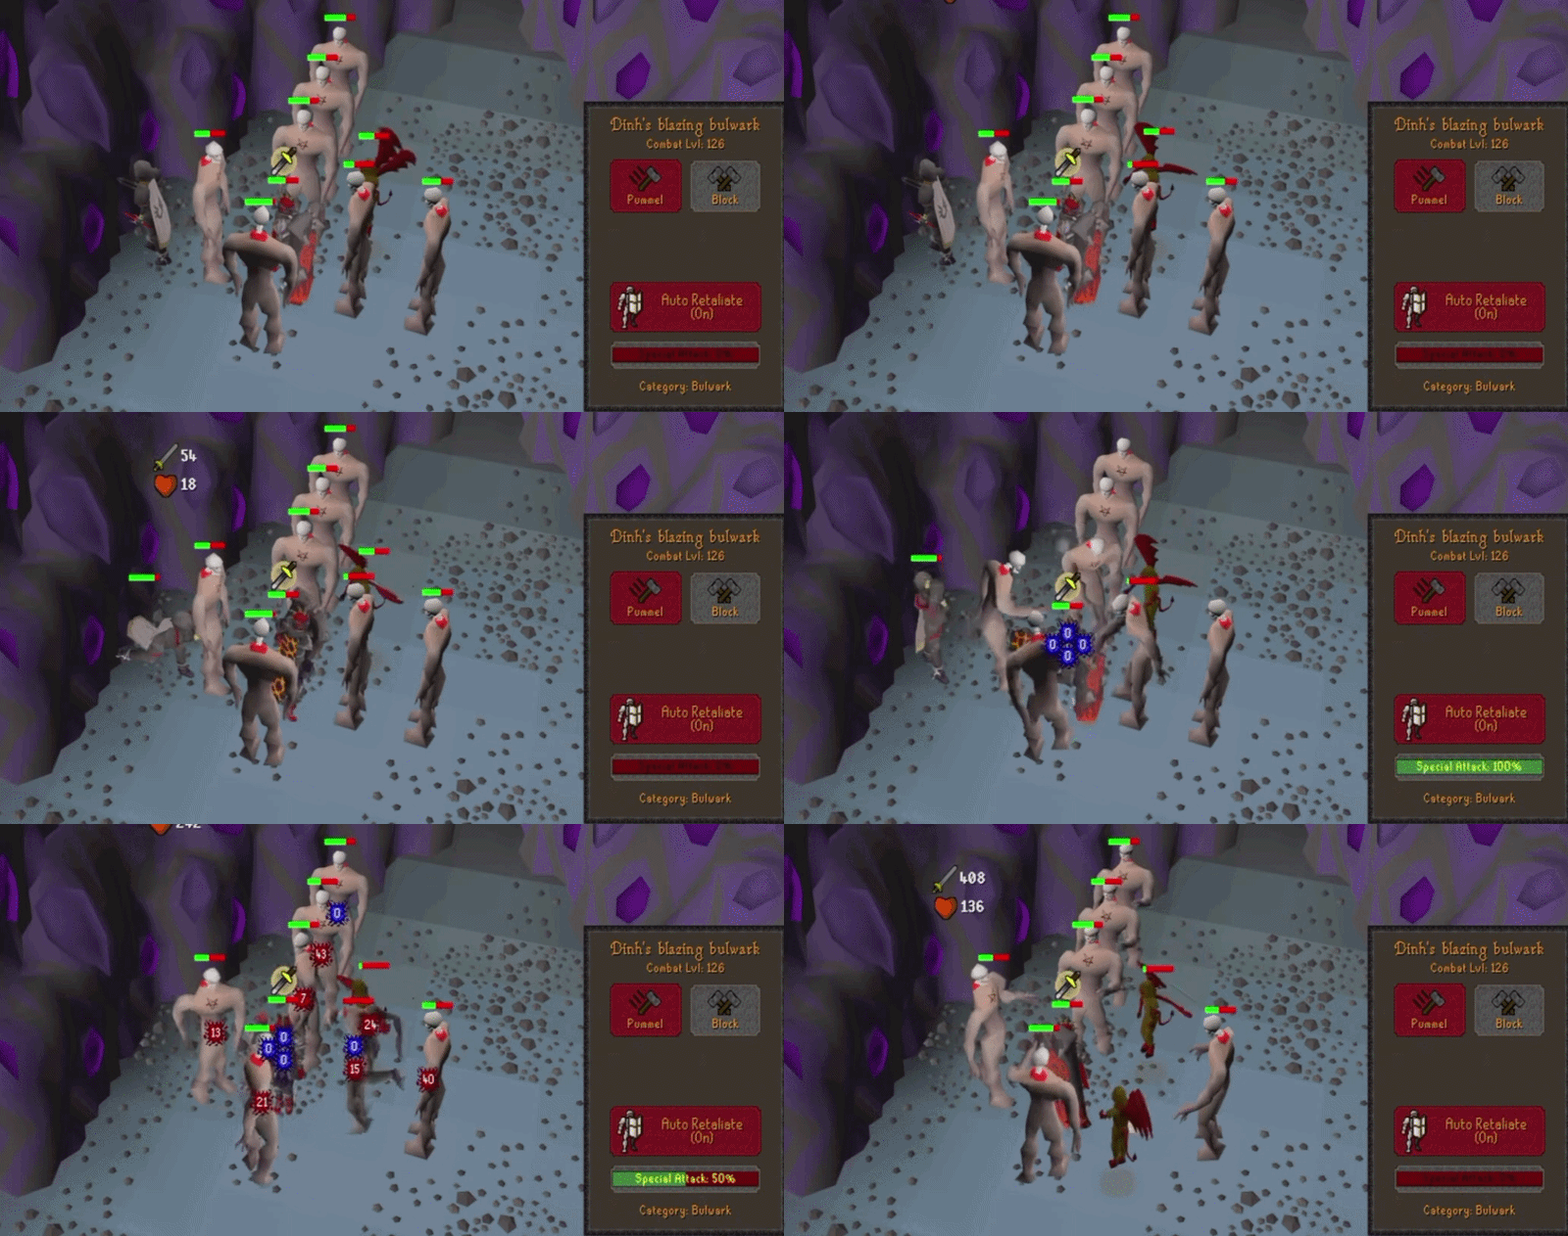
The fastest Melee method in the game is transferring Dinh's Bulwark special attack energy from alt accounts to your main while training. The Bulwark requires 75 Attack to It'sip. Its special hits up to 10 enemies within an 11x11 area and grants 20% extra accuracy, so dense spawns are ideal.
With 3 alt accounts running the Energy Transfer Lunar spell, I've seen rates reach 420k XP/hr at high combat stats, the fastest Melee XP in the game by a clear margin. The alts cycle: cast Energy Transfer, teleport to the house, regen spec, teleport back, repeat. Nechryaels in the Catacombs of Kourend is the standard spot thanks to dense spawns and easy access.
Keep in mind: This method is extremely expensive and has several requirements. Every alt account must be a member account, have completed Lunar Diplomacy to access the Lunar spellbook, and have 91 Magic to cast Energy Transfer. Because of these requirements, this method is primarily used by players chasing the fastest possible XP rates rather than being a practical option for most players.
Alternate Methods
NMZ is the fastest, but it gives no drops, and it gets dull. These methods trade a little speed for GP, Slayer XP, unique drops, or just a change of scenery. I mix these into every Melee grind to keep sessions from dragging.
Pest Control (Level 40-99): Fastest Solo Raw XP
- Requirement: Combat level 40 (Novice), 70 (Intermediate), 100 (Veteran)
- XP/hr: ~40K -180K depending on boat tier and Combat Achievement progress
- Teleportation Method: Grouping tab, Minigame Teleport, or Squire at Port Sarim
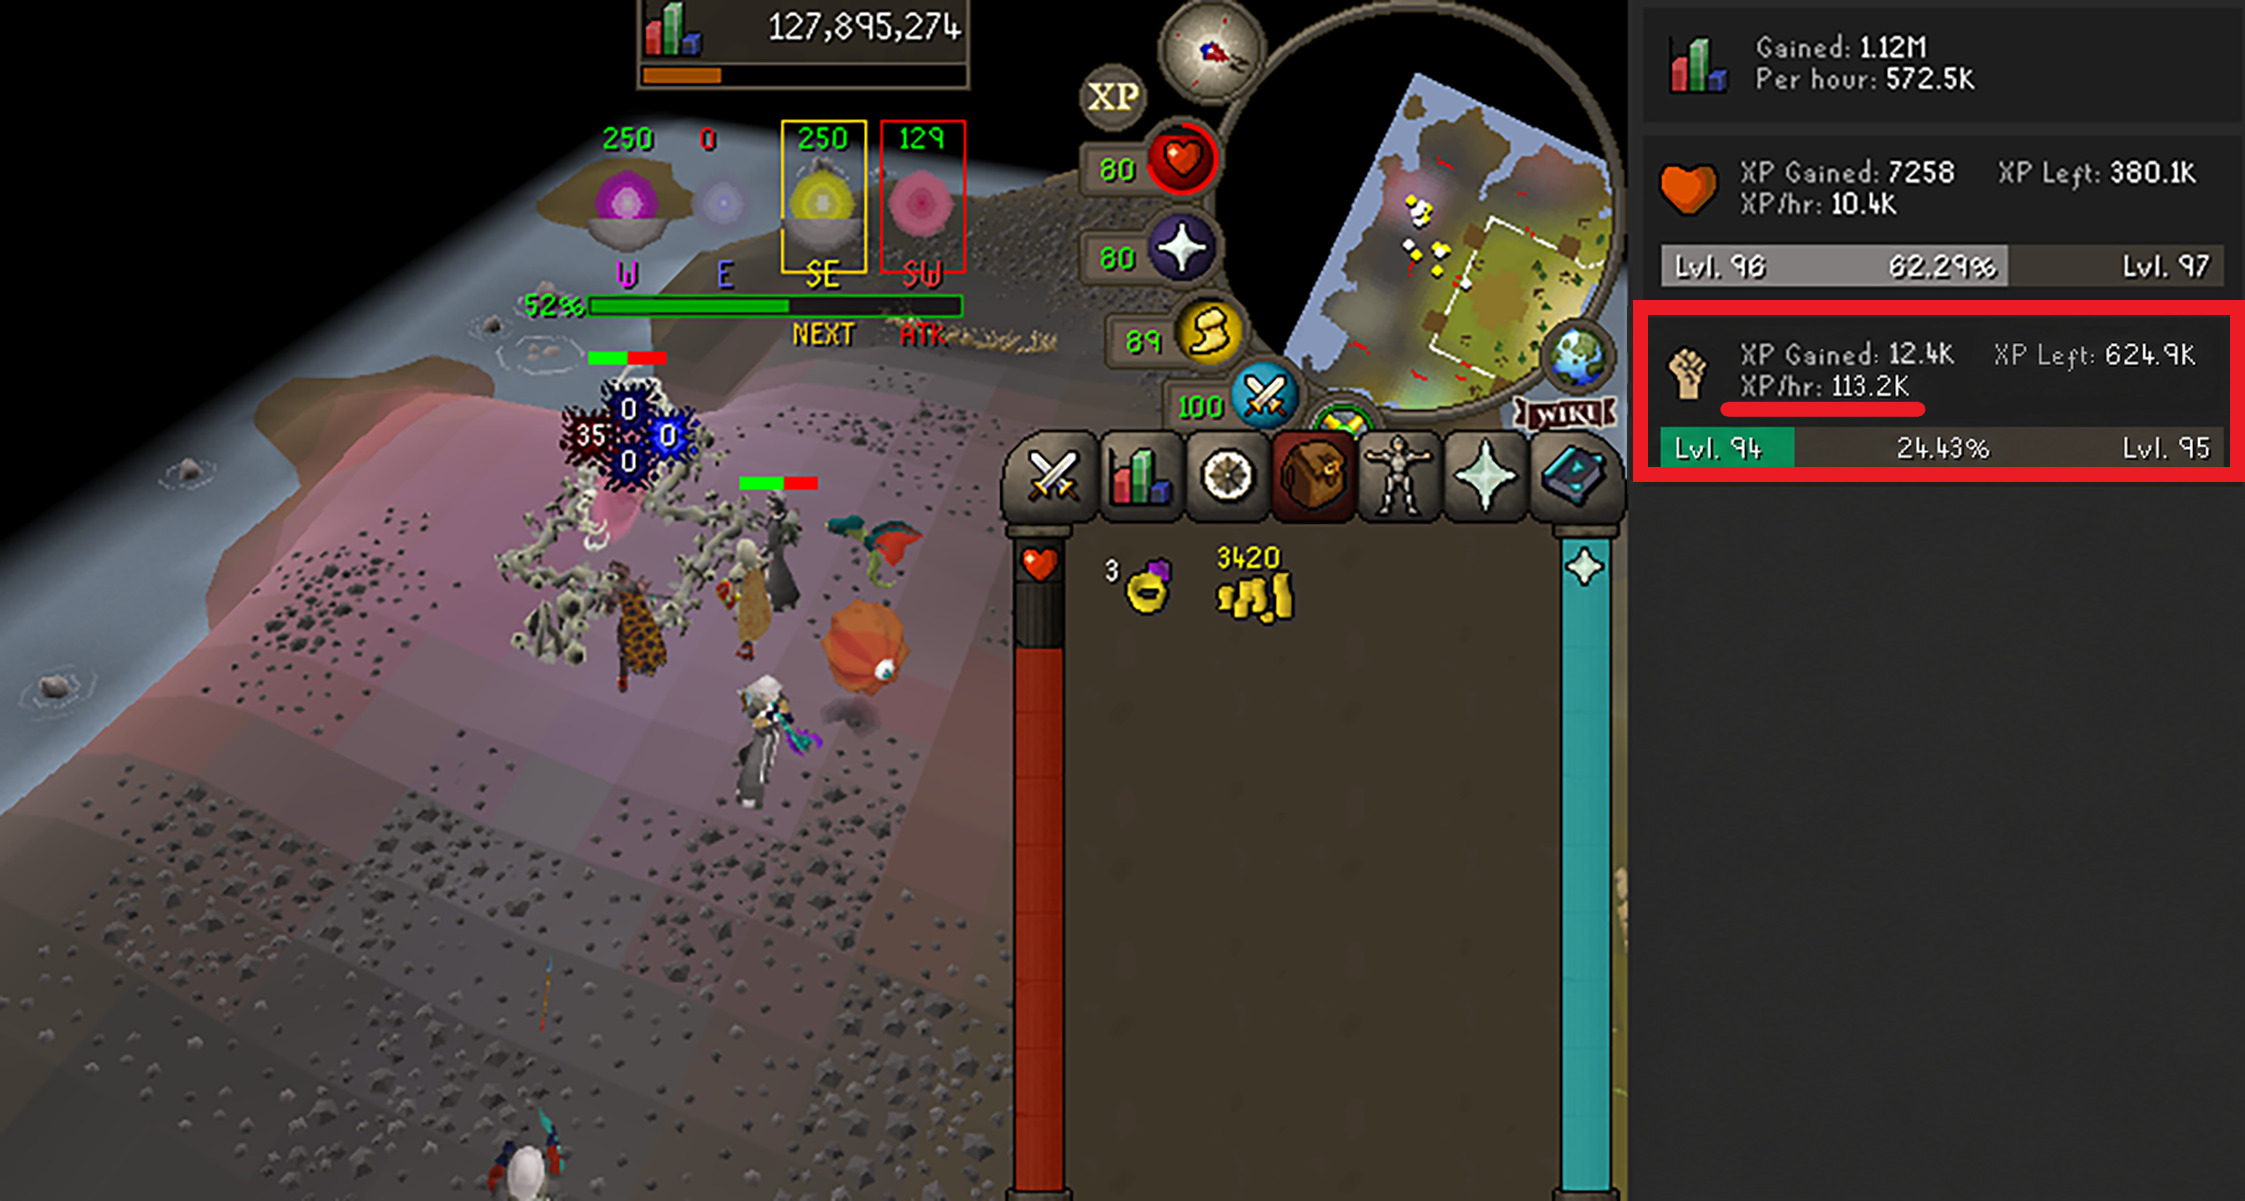
Pest Control is the sleeper method most combat guides underrate. It got a big buff when Combat Achievements were integrated: completing the Hard CA tier permanently adds +3 Pest Control points per game. On the Veteran boat (100+), that means 5 + 3 = 8 points per win, a big jump over the base rate.
Boat | Combat Req. | Base Points/Win | With Hard CA | Approx. XP/hr |
|---|
Novice | 40+ | 3 | 6 | ~20K-40K |
Intermediate | 70+ | 4 | 7 | ~50K-80K |
Veteran | 100+ | 5 | 8 | ~80K-180K |
NOTE: The 180K figure is specific to level 99 with the Hard CA bonus active; you get around 145K by converting 240 points per hour at the rewards shop, plus the regular combat XP from fighting during the rounds. At level 75, it's closer to 120-130k total, still the fastest solo XP at that level.
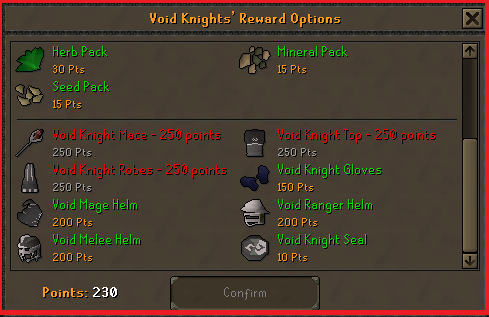
The reward shop sells Void Knight Armour. Elite Void for Range is near-BiS at Vorkath and standard for ToA invocations, so Pest Control kills two birds with one stone: fast combat XP and the Void grind. World 344 is the official PC world for the fastest queues.
Wilderness Slayer (Level 70+)
- Requirement: Combat Level 70+, confidence in surviving the Wilderness
- XP/hr: ~30,000-50,000 Melee XP/hr (depending on the task)
- Teleportation Method: Varies
If you're comfortable with the risks of the Wilderness, Wilderness Slayer is an excellent way to train Melee and earn significant GP. Most Slayer tasks take place around the Wilderness bosses and revenant areas, giving you the chance to obtain some of the game's most valuable unique drops. While XP rates are lower than with dedicated training methods such as the Nightmare Zone or Scurrius, the profit potential more than makes up for it.
Note: Wilderness Slayer carries a constant risk of being attacked by other players. Only bring gear you're prepared to lose, keep an escape teleport ready whenever possible, and stay alert for PKers. Hardcore Ironmen should avoid Wilderness Slayer entirely, as a single death will permanently remove their Hardcore status.
If you don’t want to take risks in the wilderness while doing slayer, there are also slayer tasks outside the wilderness you might consider.
Avoid Common Mistakes (I've Made Most of These)
Not Doing the Quest XP Stack First
I see new players grinding Cows at level 1 every single day. Waterfall gives 30 levels across two stats in 20 minutes with no requirements. If you're reading this at level 1 and haven't done Waterfall, stop and do it now. Don’t forget to complete the following quests to gain leverage in gaining XP at lower levels.
Staying on Dragon Scimitar Past 70 Attack (for Attack)
The Dragon Scimitar trains Strength on Aggression, which is great. But once you hit 70 Attack, the Whip has much better DPS on the Lash and Controlled styles for Attack and Defence. The catch: the Whip can't train Strength; it has no Aggressive-equivalent style. So at 70+, you use the Whip for Attack/Defence but keep a Dragon Scimitar, Abyssal Bludgeon, or Viggora's Chainmace for Strength. Many players don't realise this and wonder why their Strength isn't moving.
Using Dharok's Below 90 HP
Under 90 HP, the Dharok's set effect is mathematically weaker than Obsidian Set + Toktz-xil-ak + Berserker Necklace. The Obsidian damage bonus is a flat multiplier that doesn't care about your current HP. I've watched players try Dharok's at 70 HP and wonder why it feels slow. If your max HP is under 90, use Obsidian instead.
Enabling the Wrong Bosses in NMZ
If you enable Dream Mentor without completing Desert Treasure, your dream's point yield is divided by 6 due to a hidden mechanic. Enable both or neither. And never enable bosses with non-melee specials (Barrelchest's anchor, freezing attacks) unless you're actively watching them drain absorptions much faster than standard melee bosses. The following are the best bosses to train melee at NMZ.
Not Using the NPC Aggression Timer Plugin
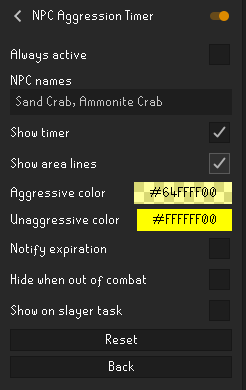
At Sand and Ammonite Crabs, the aggression timer is 10 minutes. Walking away without checking it means you might come back too early and waste the reset. The NPC Aggression Timer plugin shows the exact countdown and aggression radius. 30 seconds to install saves real frustration. You can enable the following settings in the NPC Aggression Timer.
Training Melee for Different Account Types
Main Accounts
Full quest stack first, then Gemstone or Ammonite Crabs to 70, then split your time between Sulphur Naguas and NMZ (the AFK investment for when you want to log off). Push Strength to 99 first, since it's the most impactful DPS stat, then Attack for accuracy, then Defence last.
Ironman Accounts
Quest stack is mandatory in the same order. Gemstone Crabs shine here because there's no competition, so you get full XP from the infinite-HP crab. In mid-to-late game, Sulphur Naguas is the meta, with zero cost, self-supplied Moonlight Potions, and Protect from Melee that negates all damage. NMZ works but needs self-supplied herbs for Overloads, which is a real bottleneck. Most Ironmen run Naguas as primary and NMZ for AFK sessions.
Hardcore Ironman (HCIM)
Everything from Ironman applies, with more caution. Do NOT train Wilderness Slayer; a PKer can end your status. Do NOT Dharok at the Gemstone Crab (see the warning above). At NMZ with Dharok's, make sure your Rapid Heal flick is set, and you're not AFK longer than your absorptions can cover.
Pure Accounts
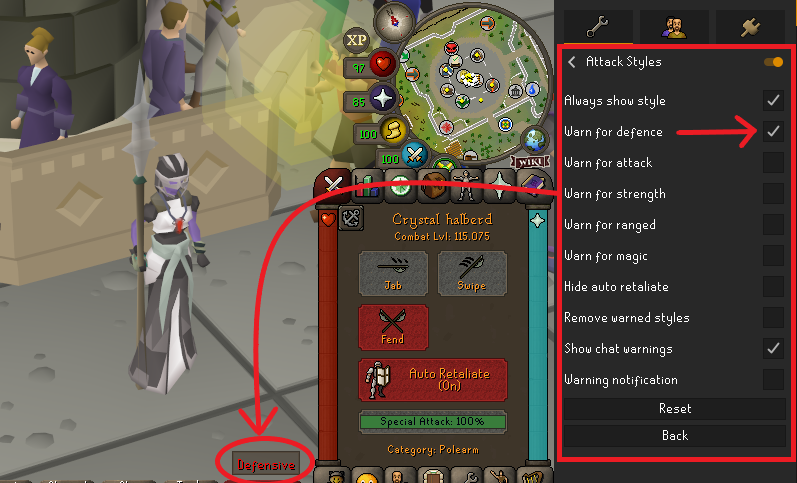
Skip Defence entirely. The real danger is accidentally clicking Controlled or Defensive during a long session; every Defence XP is permanent and ruins the build. Set your default to Aggressive for Strength and double-check every login. Train to 60 Attack for the Dragon Scimitar, optionally 75 for the Whip (remember the Whip can't train Strength, use a Scimitar or Bludgeon for that). NMZ on Aggressive for 99 Strength is the standard.
You can use the following settings in the “Attack Styles” Runelite plugin. Enable Warn for defence option.
Final Thoughts
Melee rewards patience more than any other skill in OSRS. Every level feels invisible as you grind, but the compound effect of 90+ stats is real. The tasks that took 3 minutes now take 90 seconds, and the Inferno suddenly looks doable. The grind earns you that.
Don't grind it in 200-hour marathons. Mix in Sulphur Naguas for free XP and a change of scenery, hit Scurrius when you want something active, swap to NMZ when you want to AFK. The variety isn't inefficient; it's what keeps you playing long enough actually to finish.
Good luck. The combat capes are worth chasing, and the stats that carry you into endgame content are among the most satisfying milestones in the game.
Best of Luck!